
Comprehensive Composite Restoration
Paul R. Chalifoux, DDS
A comprehensive composite restoration does not refer to and is not ideal for full-mouth rehabilitation but is ideal for specific restorative situations and smile improvements. This article describes all of the factors that determine when composite is appropriate and what steps are required to maximize results. There are 6 principles used to treatment plan and 6 principles applied to composite restoration. These 12 principles become a checklist to improve composite use and results (Figure 1).
Composite restoration requires proper treatment planning and an appreciation of restorative principles. Artistic ability and scientific knowledge produce esthetic, strong, long-lasting restorations.1,2 Artistic placement of the appropriate composite material replicates the appearance of natural tooth structure.3,4 Scientific knowledge incurs proper tooth preparation, composite selection, and techniques to produce long-lasting restorations.5,6 A dentist must know smile design, color, tooth color, position and shape, esthetic goals, and composite techniques. Composite techniques include tooth preparation, bonding, material selection, placement, and finishing techniques. Anterior and posterior teeth are restored with composite.7 There are more than 20 restorative categories and 30 smile defects commonly restored with composite. Composite is used for class I, II, III, IV, and V restorations, surface defects, composite veneers, peg laterals, diastema closure, papillae loss, composite crowns, onlays and inlays, tooth splinting, the appearance of tooth rotation and tipping, congenital defects, porcelain repair, composite repair, tooth replacement, implant access closure, and periodontal splinting. Composite corrects lost tooth structure as well as tooth position and color, including craze lines, decalcifications, fillings, discolorations, stains, dentin exposure, cavities, tipping, rotation, crowding, tooth loss, diastema, intrusion, extrusion, chips, cracks, abrasions, attrition, wear, surface defects, surface texture, gingival contours, and developmental defects.8
Posterior composites have the least impact on smile design. Replacement of amalgam changes silver to tooth color and minimizes show-through to the buccal aspects. Posterior composite restorations are very technique sensitive and require special attention to the principles presented.9-11
CASE ONE: Posterior composites
In this case, the patient presents with failing amalgam restorations and interproximal decay on the first and second molars requiring restoration (Figure 2A). After administration of anesthetic and rubber dam isolation, the amalgam and decay are removed, the enamel is finished, and matrix systems are placed. Enamel and dentin are bonded with etching and application of OptiBond® Solo (Kerr Corp., Orange, CA) to form a resin hybrid layer. (Figures 2B and 2C). Composite (Premise™ body shade, Kerr) is added in layers while touching no more than 2 walls at a time to minimize stress from shrinkage (often referred to as the C-factor) and replicate dentin color. Enamel-shaded composite (Premise translucent) is layered, cured, shaped, custom colored, and polished (Figure 2D).
Treatment Planning
Patient care requires comprehensive treatment planning. Smile design is an important aspect of comprehensive treatment planning and composite restoration. Dominance, proportion, perspective, symmetry, and balance produce a pleasing appearance.12-17 Normal contacts, long axis, gingival apex, incisal and gingival height of contour, parallel anatomy from tooth to tooth–including the silhouette of the teeth and face anatomy–define normal pleasing teeth and smile relationships.5,18,19 It is normal to see all oval or all square teeth but it is not pleasing to mix them. The ideal relationships can be seen in Figure 3.
In 1978, Levin described the principle of golden proportion to evaluate facial features, smile design, and tooth proportions.20 The golden rule is an ancient principle used in mathematics, art, and architecture to provide a guide for esthetically pleasing proportion. A line is divided into 2 parts so that 1 part is the mean and the other part is the extreme. The ratio of proportion is 1 to 1.618, as mean to extreme. Interestingly, the same progression of numbers can be achieved by multiplying 1.618 or dividing by 0.618.21 This proportion is applied to buildings, drawings, body parts, and smiles. In addition, to make a smile pleasing, a line drawn through the pupils of the eyes should be perpendicular to the midline. The lip line and overall incisal edges of the teeth within an arch should be parallel to the line drawn through the pupils. A smile’s fit within a face must include smile size, shape, position, etc.
A line drawn following the outline formed by the incisal edges of the maxillary teeth should be 1 mm to 3 mm parallel/equidistant to the lower lip line. Variation occurs with age. Older individuals loose elasticity in the lips, which results in sagging. Prominence of the mandibular teeth and diminution of the maxillary teeth results from this sagging. A masculine smile forms a straight smile while a feminine smile forms a curved smile.12-15
An anterior tooth compared to the adjacent distal tooth has an extreme-to-mean proportion when looking straight at the overall smile. Golden proportion exists thoughout a smile, including the cervical apex of a tooth to the height of the gingival papillae relative to the height of the gingival papillae to the incisal edge of a tooth and the mesial of the central incisor to the distal of the cuspid compared to the distal of the cuspid to the distal of the last posterior tooth.20
Esthetic treatment planning is important even when small restorations are anticipated. Completed work may need to be redone if comprehensive treatment is done later and overlaps with already completed work. For example, class V and class III restorations would be part of a veneer and would not be done as 2 separate procedures on the same tooth.
Tooth Shape, Position, and Color
Tooth position is determined by arch shape, arch position, occlusion, normal tooth height, and orientation. Anterior maxillary teeth tip to the mesial. The long axis of the maxillary cuspid normally tilts to the mesial and appears to have a lingual tilt from the gingival height of contour to the incisal edge. Anatomic features such as line angles, height of contour, gingival contour, embrasure form, contacts, incisal edge, facial contour and texture, and small anatomy such as grooves or dimples define tooth shape. Each anatomic feature varies depending on general tooth shape such as oval, tapered, or square.22
Enamel is translucent and prismatic with slight hue, chroma, and value. Dentin shows through enamel to create tooth color. In the center portion of a tooth, enamel is thickest and shows less dentin. Incisal and interproximal enamel has no dentin behind it when viewed from the facial aspect so it shows through the darkness of the back of the mouth to look gray. Enamel thins in the gingival third of a tooth, which increases yellow color. Color variation occurs from dentin discolorations showing through enamel, maturation defects, staining, hypocalcifications, cracks, and enamel defects.23,24
Composite restorations restore tooth position, structure, and color. Color is a unique science of how the eye and mind see light, including hue, value, chroma, translucency, and fluorescence. Hue is the color quality determined by the color’s wavelength (such as red or blue). Value is the lightness or darkness of a color. Chroma is the saturation or brightness of a color. Translucency is the ability of light to pass through material. Fluorescence is light emitted during absorption of radiation or other invisible light.
Light changes with reflection, refraction, and absorption caused by composite surfaces, matrix, and fillers.25,26 The components of a restoration including composite, tints, opacity, and tooth structure create subtractive, additive, or partitive color. Subtractive color is the process of mixing pigments together. Additive color is the method of creating color by mixing various proportions of 2 or 3 distinct stimulus colors. Partitive color uses small dots or patches of colors placed adjacent to each other. From a distance, the eye mixes them to form a new color. Color change occurs unintentionally if a clinician does not understand these concepts. For example, if a dentist places a blue tint on yellow composite to replicate an incisal edge, green is produced.
The dentist and patient together define treatment goals. A perfect Hollywood smile or a natural smile are 2 common, general goals.25,26 A patient decides which smile defects are acceptable when creating a natural smile. Results are further limited by general appearance, emotional influences, and environmental considerations. For example, people in Mongolia would look awkward with the Hollywood smile. There are physical, financial, and psychological limitations as well. Financial and psychological factors limit the materials used, the amount of dentistry done, and a timeline for completing work.27
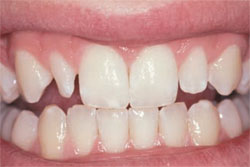
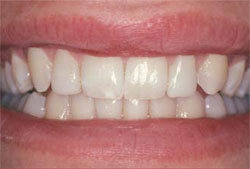
CASE TWO: Composite Veneers
In this case, a patient presents with yellow, chipped, and poorly restored anterior teeth (Figure 4A). Improper tooth shape, proportion, position, and color is seen (Figure 4B). The patient requested composite restorations. The old composite is removed and the teeth prepared for composite veneering. After bonding and matrix placement, composite (Point 4TM, Kerr) is placed and shaped with composite instruments before curing. Final contouring and surface texturing is done with finishing burs after curing. Polishing is completed with sandpaper discs, polishing cups and points, and polishing pastes (Figures 4C and 4D).
Composite Restoration
Composite restoration requires proper tooth preparation, bonding, composite selection, placement, pre- and postcure shaping, and finishing. Tooth preparation gains access to caries, removes caries, increases surface area, creates mechanical retention, and finishes enamel margins.28,29 Preparation design improves resistance to forces analyzed by force intensity, frequency, duration, and direction.30,31 Carbide burs often create access to cavities while diamond burs are commonly used to increase surface area, create cross-sections of enamel rods, and remove tooth structure such as sclerotic or carious dentin for improved bond strength.
Bonding supports composite, reduces sensitivity, minimizes microleakage, and lessens the need for mechanical retention and resistance form.32,33 Enamel bonding is a simple procedure and predictable while dentin bonding is technique sensitive, and varies from manufacturer to manufacturer.34 Special procedures are required for bonding to materials such as composite, porcelain, and metals. Microetching, silination, and mechanical retention are common techniques.
Composite selection is based on esthetic characteristics, material strength and wear, and ease of placement, shaping, and polishing. Composite replicates dentin and enamel with proper hue, chroma, value, translucency, and fluorescence. Additional materials are required to maximize results. Tints and opaques custom-colorize composite and block out color.35
Opaque composite is also used to block out defect color when tooth backing exists and block out the darkness from the back of the mouth when no tooth backing exists. No tooth backing exists if there is no tooth structure behind a filling when viewed from the facial.36 The back of the mouth receives little light and appears dark. A translucent composite placed in a defect with no tooth backing shows through this darkness and appears dark or grey. Defects with tooth backing have different colors, depth, size, and locations. Defect color shows through composite if light intensity is high, the defect depth is shallow (which makes the composite layer thin), or if the composite is very translucent. Composite layering with appropriate opaque and translucent materials, proper defect preparation, and composite surface texturing is done to correct a large color change. Surface texturing creates small areas of light reflection and light refraction that makes composite look lighter.
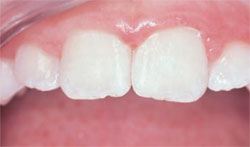
CASE THREE: Class IV Restoration
This patient presented with a traumatic fracture of the left central incisor creating a smile defect (Figure 5A). In this case, composites (Point 4 body shade and enamel shade) are layered to replace dentin and enamel. Tooth anatomy replicates a symmetrical view of the right central incisor. The line angles, tooth contours, long axis, incisal edge anatomy, surface texture, and color that creates a natural appearance should be observed (Figure 5B).
Composite strength is defined by shear, compressive, tensile, and modulus of elasticity, etc.37,38 Composite is made stronger with increased thickness, reduction of internal stress from curing shrinkage by layering techniques, minimizing the C-factor (the number of walls joined over the number or walls not touched),39 and by the ability to stop crack propagation as occurs with larger filler particles. Unfortunately, large filler particles create increased wear. Matrix resin wears to expose more surface area of a large particle, which causes it to dislodge, and makes the composite restoration wear excessively.40-43
Restoration strength is defined by composite strength, composite-to-tooth interface strength, and tooth structure strength. Forces on composite restorations can be internal, mechanical, or thermal.44-47 Internal stress is created by resin matrix shrinkage. Stress is created within the resin matrix and at the resin-to-filler interface. Mechanical forces are defined by direction, duration, intensity, and frequency.48 Thermal coefficient of expansion applies force, which is created when hot or cold is applied, and the composite and tooth structure contract and expand.
Composite wear is critical to composite selection particularly if forces are strong and direct. Adhesive, abrasive, chemical, and fatigue wear increase with increased contact.49-51 Wear causes functional or esthetic failure. Many composite characteristics (such as wear) are harder to quantify because there is variation from in vivo versus in vitro studies.
Composite is selected by placement characteristics. Proper composite placement produces ideal tooth color. Proper matrix techniques confine material within the restoration boundaries. A material that is too firm will displace a matrix. Composite needs to be able to flow enough to wet surfaces so that air is not trapped at the tooth-to-composite or composite-to-composite interfaces and yet be firm enough that it can be shaped before curing. Composite cannot be so light sensitive that it sets before intentional curing. Layers must join using the oxygen inhibited layer as occurs during layering techniques.38,52 Composites such as packable composites minimize joining of layers because the highly filled material has less resin exposure.
Composite shaping, finishing, texturing, and polishing should be easy. Different composites require different instrumentation and techniques,53-55 which are usually defined by the manufacturer. Selection of instruments, sand- paper discs, polishing cups and points, brushes, cloth wheels, finishing burs, diamond burs, and pastes are critical to proper polishing and finishing.
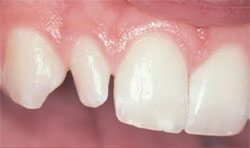
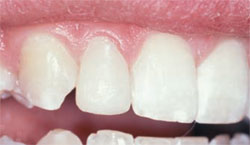
CASE FOUR: Peg Laterals
A 15-year-old adolescent boy presents with peg laterals (Figures 6A and 6B). The peg laterals are prepared with a diamond bur to clean the enamel surface and increase surface area. Enamel bonding is completed by acid etching and application of OptiBond Solo. Composite (Point 4 body shade) is added freehand to provide general shaping without touching the adjacent teeth, which helps support the matrix. Composite is cured and a clear plastic matrix is placed. A final composite layer (Point 4 translucent) is added, shaped, and cured. Final shaping and smoothing is done with sandpaper discs. Surface texturing is accomplished with a diamond bur and final polishing is accomplished with polishing cups and paste (Figures 6C and 6D).
CONCLUSION
Composite restoration involves 12 major areas of knowledge. A dentist needs to understand each aspect of restoration or the results may be imperfect. These restorations may in turn require replacement if they are esthetically inadequate, fracture, wear, leak, change appearance, or are painful.
ACKNOWLEDGMENTS
Photos are published with the permission of www.dentalcomposites.com.
DISCLOSURE
The author received financial/materials support from Kerr Corporation.
REFERENCES
1. Mjor IA. Selection of restorative materials in general dental practice in Sweden. Acta Odontol Scand. 1997;55(1):53-57.
2. Hickel R, Dasch W, Janda R, et al. New direct restorative materials. FDI Commission Project. Int Dent J. 1998;48(1):3-16.
3. Jordan RE, Croll TP. Resin enamel bonding. In: Esthetic Composite Bonding Techniques and Materials. Saint Louis, Mo: Mosby; 1992.
4. Goldstein RE. Change Your Smile. Hanover Park, Il: Quintessence Publishing; 1997.
5. Chalifoux PR. Checklist to Aesthetic Dentistry. Pract Periodontics Aesthet Dent. 1990;2(1):9-12.
6. Farracain JL. Current trends in dental composites. s 1995;6(4):302-318.
7. Roulet JF, Wilson N, Fuzzi M. Advances in Operative Dentistry: Contemporary Clinical Practice. Hanover Park, Il: Quintessence; 2001.
8. Chalifoux PR. Perception esthetics: factors that affect smile design. J Esthet Dent. 1996;8(4)189-192.
9. Kugel G. Direct and indirect adhesive restorative materials: a review. Am J Dent. 2000;13(special issue): 35D-40D.
10. Hirabayashi S, Hood JA, Hirasawa T. The extent of polymerization of class II light-cured composite resin restorations; effects of incremental placement technique, exposure time and heating for resin inlays. Dent Mater J. 1993;12(2):159-170.
11. Kanca J 3rd. The effect of thickness and shade on the polymerization of light-activated posterior composite resins. Quintessence Int. 1986;17:809-811.
12. Goldstein RE. Esthetics in Dentistry. Hamilton, Ontario, Canada: BC Decker; 2006.
13. Young S. Human facial expressions. In: Jones S, Martin R, Pilbeam DR, eds. The Cambridge Encyclopedia of Human Evolution. Cambridge, United Kingdom: Cambridge University Press;1992:164-165.
14. Kingdon J. Facial patterns as signals and masks. In: Jones S, Martin R, Pilbeam DR, eds. The Cambridge Encyclopedia of Human Evolution. Cambridge, United Kingdom: Cambridge University Press; 1992: 161-165.
15. Rubin LR. The anatomy of a smile: its importance in the treatment of facial paralysis. Plast Reconstr Surg. 1974;53(4): 384-387.
16. Paletz JL, Manktelow RT, Chaban R. The shape of a normal smile: implications for facial paralysis reconstruction. Plast Reconstr Surg. 1993;93(4): 784-789.
17. Janzen EK.A balanced smile. a most important treatment objective. Am J Orthod. 1977;72(4):359-372.
18. Singer BA. Principles of esthetics. Curr Opin Cosmet Dent. 1994: 6-12.
19. Singer BA. Fundamentals of esthetics. In: Dale BG, Aschheim KW, eds. Esthetic Dentistry: A Clinical Approach to Techniques and Materials. Philadelphia: Lea & Febiger;1993:5-13.
20. Levin EL. Dental esthetics and the golden proportion. J Prosthet Dent. 1978;40(3):244-252.
21. Huntley HE. The Divine Proportion. Mineola, NY: Dover Publications; 1970.
22. Rener RP. An Introduction to Dental Anatomy and Esthetics. Hanover Park, Il: Quintessence Publishing; 1985.
23. Chiche GJ, Aoshima H. Smile Design: A Guide for Clinician, Ceramist, and Patient. Hanover Park, Il: Quintessence Publishing; 2004.
24. Chu SJ, Devigus A, Mieleszko AJ. Fundamentals of Color: Shade Matching and Communication in Esthetic Dentistry. Hanover Park, Il: Quintessence Publishing; 2005.
25. Brisman AS. Esthetics: a comparison dentists’ and patients’ concepts. J Am Dent Assoc. 1980;100(3): 345-352.
26. Qualtrough AJ, Burke FJ. A look at dental esthetics. Quintessence Int. 1994;25(1):7-14.
27. Chalifoux P. Perception esthetics: factors that affect smile design. J Eshtet Dent. 1996;8(4)189-192.
28. Porte A, Lutz F, Lund MR, et al. Cavity designs for composite resins. Oper Dent. 1984;9(2):50-56.
29. Edelhoff D, Sorensen JA. Tooth structure removal associated with various preparation designs for anterior teeth. J Prosthet Dent. 2002;87(5): 503-509.
30. Bonjardim LR, Gaviao MB, Pereira LJ, et al. Bite force determination in adolescents with and without temporomandibular dysfunction. J Oral Rehabil. 2005;32(8):577-583.
31. Cosme DC, Baldisserotto SM, Canabarro Sde A, et al. Bruxism and voluntary maximal bite force in young dentate adults. Int J Prosthodont. 2005;18(4): 328-332.
32. Kanca J 3rd. Improving bond strength through acid etching of dentin and bonding to wet dentin surfaces. J Am Dent Assoc. 1992;123(9): 35-43.
33. Gwinnett AJ. Bonding basics: what every clinician should know. Esthet Dent Update. 1994;5:35-41.
34. Leinfelder K. Dentin adhesives: the newest generation. Esthet Dent Update. 1994;5: 50-52.
35. Chalifoux PR. Composite tints: mixing composite materials to alter color and techniques to simulate hypocalcification and craze lines. Compend Contin Educ Dent. 2004;25(8):583-588.
36. Chalifoux PR. Perception aesthetics and light-cured composites. Pract Periodontics Aesthet Dent. 1992;4(5):51-56.
37. Craig RG. Restorative Dental Materials. 6th ed. St. Louis, Mo: Mosby; 1980.
38. Unterbrink G. Esthetic dentistry (part one). Direct composites. Dental Medium. 1998;6(4)13-18.
39. Mallmann A, Soares F, Placido E, et al. Microtensile dentin bond strength of self-etching and single-bottle adhesive systems in different cavity configurations. J Adhes Dent. 2003;5(2):121-127.
40. Roulet JF. Degradation of Dental Polymers. Basel, Switzerland: Karger; 1987.
41. Smith JC, Kermish GA, Fenstermaker CA. Separation of filler particles from the matrix in a particulate-loaded composite to tensile stress. J Adhes. 1972;4:109-124.
42. Dicksen G. Physical and chemical properties and wear. J Dent Res. 1979;58(5):1535-1543.
43. Draughn RA. Influence of filler parameters on mechanical properties of composite restorative materials. J Dent Res. 1983;62(spec issue A):640. Abstract 187.
44. Pazinatto FB, Campos BB, Costa LC, et al. Effect of the number of thermocycles on microleakage of resin composite restorations. Pesqui Odontol Bras. 2003;17(4):337-341.
45. Kovarik RE, Ergle JW. Fracture toughness of posterior composite resins fabricated by incremental layering. J Prosthet Dent. 1993;69(6): 557-560.
46. Noetzel M, Gente M, Klingler K. Reduction of polymerization stress of composite resin on model cavities. Int Poster J Dent Oral Med. 2005;7(2). Poster 276.
47. Aarnts MP, Akimade A, Feilzer AJ. Effect of filler load on contraction stress and volumetric shrinkage. J Dent Res. 1999;78(special issue):482. Abstract 3014.
48. Chalifoux PR. Esthetic restoration of endodontically treated teeth: factors that affect prognosis. J Esthet Dent. 1998;10(2):75-83.
49. Lutz F, Mormann W. In vivo wear of posterior tooth composites. J Dent Res. 1982;62(spec issue A):215. Abstract 326.
50. Manhart J, Kunzelmann KH, Chen HY, et al. Mechanical properties and wear behavior of light-cured packable composite resins. Dent Mater. 2000;16(1):33-40.
51. Lutz F, Phillips RW, Roulet JF, et al. Potential posterior composites. An in vitro and in vivo comparison for wear. J Dent. Res. 1984;63(6):914-920.
52. Rueggeberg RA, Margeson DH. The effect or oxygen inhibition on an unfilled/filled composite system. J Dent Res. 1990;69(10):1652-1658.
53. Stoddard JW, Johnson GH. An evaluation of polishing agents for composite resins. J Prosthet Dent. 1991;65(4):491-495.
54. Watanabe T, Miyazaki M, Moore BK. Influence of polishing instruments on the surface texture of resin composites. Quintessence Int. 2006;37(1): 61-67.
55. Turssi CP, Rodrigues AL Jr, Serra MC. Textural characterization of finished and polished composites over time of intraoral exposure. J Biomed Mater Res B Appl Biomater. 2006;76(2): 381-388.
 | ||
| Figure 1 An outline of the steps in treatment planning a comprehensive composite restoration. | ||
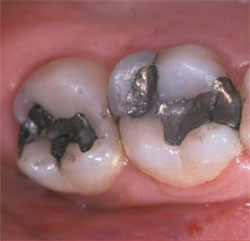 | 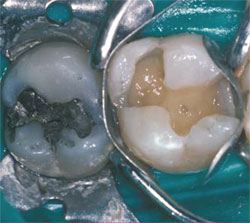 | |
| Figure 2A Defective amalgam restorations and interproximal decay requiring restoration. | Figure 2B The first molar is prepared, bonded, and the matrix is placed. | |
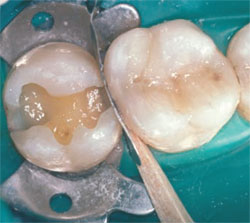 | 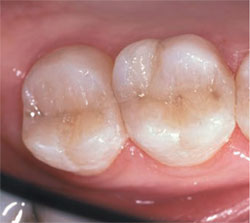 | |
| Figure 2C The second molar is prepared, bonded, and the matrix is placed. | Figure 2D Final composite restorations. | |
 | 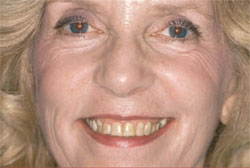 Figure 4A Full facial view showing a defective smile. 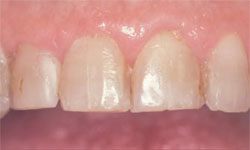 Figure 4B Close up of worn, discolored anterior teeth with poor restorations. 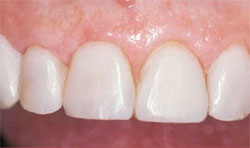 Figure 4C Composite veneers with improved tooth shape, position, and color.  Figure 4D Full facial view showing the smile restored with composite. | |
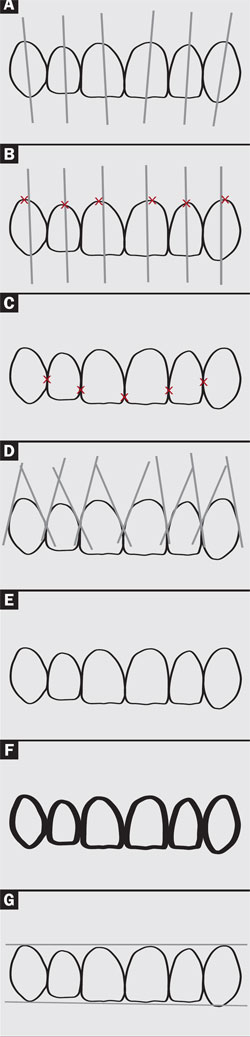
| Figure 3 Illustrations of (A) long axis, (B) gingival apex, (C) contact points, (D) parallel anatomy, (E) teeth faces, (F) teeth silhouettes, and (G) gingival incisal heights. | ||
 |  | |
| Figure 5A A traumatic fracture of the upper left central incisor. | Figure 5B The same central incisor properly restored with composite. | |
 |  | |
| Figure 6A A smile revealing peg laterals. | Figure 6B A close-up of one peg lateral. | |
 |  | |
| Figure 6C The peg lateral restored with composite. | Figure 6D The same smile 7 years after composite restoration. | |
| About the Author | ||
 Paul R. Chalifoux, DDS Paul R. Chalifoux, DDS Private Practice Wellesley, Massachusetts | ||


