You must be signed in to read the rest of this article.
Registration on CDEWorld is free. You may also login to CDEWorld with your DentalAegis.com account.
As implant dentistry became more and more predictable during the past 3 decades, it appeared that the replacement of missing teeth with pontics would decline. However, this has not been the case. There are still significant advantages associated with the use of pontics in conjunction with both natural teeth and implants. Commonly, the use of a pontic to replace a missing anterior tooth results in superior esthetics when compared with those of an implant-supported crown. After the loss of an anterior tooth, the maintenance of the interdental papillae is an essential component of an esthetic replacement. Salama and colleagues reported that a papilla between a tooth and an implant-supported restoration can only be maintained to an average height of 4.5 mm whereas a papilla between a tooth and a pontic can be maintained to an average height of 6.5 mm.1 In addition, in a Seibert Class I defect where there is only loss of buccal volume, the deficiency can commonly be grafted with soft tissue, and there is no need for a bone graft, which would be required for an implant.2 Furthermore, it has been shown that once an ovate pontic is placed, the supporting soft tissue remains stable long term.3
Through the years, there has been much discussion regarding the design of pontics. However, there is a general consensus today that the design of choice in the anterior maxilla is the ovate pontic. In 1980, the ovate pontic was described by Abrams as having a gingival surface that was convex in all dimensions.4 This allowed for improved oral hygiene, which has been shown to be essential to the health of the gingiva around a pontic.5,6 Authors have described several variations on this traditional "egg in the nest" design. Eubanks proposed the "E pontic," which has a square- rather than egg-shaped surface under the gingiva.7 Liu proposed the "modified ovate pontic."8 In this design, the height of contour of the tissue surface is moved from the center of the base to a more labial position. He suggested that this modification improved the patient's ability to floss under the pontic. More recently, Gomez-Meda and Esquivel suggested two different pontic designs that are both based on the available soft tissue.9
Pontic Design
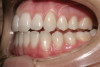
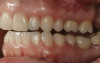
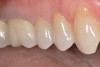
It is essential that an ovate pontic be convex in all dimensions. However, with the traditional "egg in the nest" shape, the gingival marginal tissue over the facial aspect of the pontic is commonly rolled rather than knife edged, which can result in a shadow (Figure 1) and give away that it is a pontic rather than a natural tooth. Therefore, the critical issue isn't the shape of the intaglio surface of the pontic but rather the emergence profile of the pontic on its facial surface. Where the facial aspect of an ovate pontic emerges from the soft tissue, it should have the same contour as a natural tooth. Therefore, it should not be rounded. The facial aspect of an ovate pontic should have a flat surface that goes approximately 1.0 mm under the gingival crest before it starts to become rounded (Figure 2). The shape of the rounded surface of the pontic is determined by the thickness of the ridge in the created site. It will be more round for a thick ridge and more pointed for a thin ridge.
Ideally, the space created for a pontic should be approximately 1.0-mm to 1.5-mm deep.8 This is shallow enough to allow access for easy flossing while deep enough to allow for a natural appearing emergence of the pontic from the tissue. In addition, there must be adequate remaining tissue between the pontic and the alveolar bone. Pozzi and colleagues proposed a concept that they termed "prosthetic biologic width" to describe the thickness of tissue necessary between a pontic and the alveolar bone, which is 2.26 ± 0.6 mm.10 Both Gargiulo11 and Vacek12 evaluated the average distance from the base of the sulcus to the alveolar bone and found it to be approximately 2.0 mm. This distance can be determined by using a periodontal probe to sound for the bone at an ovate pontic site. Violation of the prosthetic biologic width can result in discomfort, inflammation, ulceration, and thinning of the epithelium.
Creating a Pontic Site for a Provisional Bridge
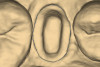
To create an ovate pontic site in an edentulous area for the placement of a provisional restoration, first, the abutment teeth are prepared. The pontic site is then prepared with a teardrop-shaped diamond bur to be approximately 1-mm deep (Figure 3). Next, an impression is made or an intraoral scan is acquired, and a provisional bridge is fabricated. Flowable composite is then placed onto the intaglio surface of the pontic to create a smooth surface with the correct emergence profile on the facial aspect, and the provisional bridge is polished.
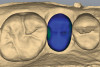
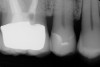
The distance between the bottom of the ovate pontic site and the alveolar bone is determined using a periodontal probe to sound for the bone. If the measured distance is 2 mm or greater (Figure 4), then there is adequate tissue thickness to meet the prosthetic biologic width requirements, and the provisional restoration can be cemented with provisional cement. However, if the tissue thickness is less than 2 mm, then there is not adequate tissue present to meet the prosthetic biologic width requirements (Figure 5), and the pontic site must be deepened using a teardrop-shaped diamond bur (Figure 6). The remaining soft tissue and enough alveolar bone are removed to result in the required 2-mm distance from the most subgingival aspect of the pontic to the alveolar bone. It is essential that the intaglio surface of the pontic be correctly contoured before the reshaping of the pontic site. The provisional bridge can then be cemented with a provisional cement and the provisional pontic will direct the regrowth of the soft tissue.
Approximately 6 weeks later, the provisional bridge is removed and the final impression is made. The day that the definitive bridge is placed, minor adjustments can be made to the facial surface of the pontic to ensure that the pontic demonstrates the same emergence profile as the adjacent abutment tooth. Once the fit of the bridge is confirmed, the patient should be instructed to bite on the bridge with a cotton roll for 5 minutes. If the tissue continues to blanch after 5 minutes, either the pontic or the soft-tissue site can be reshaped to eliminate it. The definitive bridge is then cemented or bonded.
Creating a Pontic Site on the Day the Definitive Bridge Is Inserted
After the abutment teeth are prepared and a provisional bridge is fabricated, an impression or intraoral scan is acquired, and the provisional bridge is cemented with a provisional cement. At the laboratory, an ideal ovate pontic site is created on the master cast, and the definitive prosthesis is fabricated.
On the day of insertion, the ovate pontic site is created with a teardrop-shaped diamond bur to replicate the site on the cast. The newly created site can be slightly larger in dimension than the site on the cast in order to ensure complete seating of the bridge. After the bridge is tried in, if required, additional tissue can be removed from the pontic site until complete seating is confirmed.
The distance between the bottom of the ovate pontic site and the alveolar bone is determined using a periodontal probe to sound for the bone. If the measured distance is 2 mm or greater, then there is adequate tissue thickness to meet the prosthetic biologic width requirements. However, if the tissue thickness is less than 2 mm, then the pontic site must be deepened using a teardrop-shaped diamond bur until enough alveolar bone is removed to result in the required 2-mm distance. Hemostasis is accomplished with an astringent, and then the bridge can either be cemented or bonded.
Creating a Pontic Site in an Immediate Extraction Socket
In order to preserve the architecture of the soft and hard tissues, it is essential that the extraction be atraumatic.13 For immediate placement to be successful, ideally, the provisional ovate pontic should be fixed rather than removable. The movement of a pontic on a removable prosthesis doesn't adequately support the facial and interproximal tissue in an extraction site.
A provisional bridge is fabricated with the ovate pontic extending into the extraction socket. The length of the pontic is based on a prediction regarding how much tissue retraction will occur during healing.14 In situations in which there is bone loss, the tissue is highly scalloped,15 or the supracrestal attachment is "low crest,"16 there will be more tissue retraction during healing, so the ovate pontic must extend at least 3.0 mm past the free gingival margin into the socket. When the tissue has a thick biotype with a flat interproximal scallop, or the supracrestal attachment is "high crest,"16 the pontic need only extend into the socket by 1 mm to 1.5 mm, which is deep enough to support the facial and interproximal tissue.
If the soft tissue isn't being adequately supported by the pontic during the healing phase, the provisional bridge is removed, and additional material is added to the pontic to establish tissue support. The extraction site should be completely healed before the definitive restoration is fabricated, and it has been reported that this commonly takes 3 to 4 months.14,17Clinical judgement is necessary when making this determination. Once healing is complete and the tissue is stable, the final impression or scan is acquired for the definitive prosthesis.
Case Report
A patient presented with two defective 3-unit fixed partial dentures spanning teeth Nos. 6 through 8 and teeth Nos. 9 through 11 (Figure 7). The defective fixed partial dentures were removed (Figure 8), an impression was made, and traditional provisional fixed partial dentures without ovate pontics were placed. After the impression was sent to the laboratory, the lab technician prepared ovate pontic sites on the stone cast (Figure 9) and fabricated the new definitive bridges. On the day of insertion, the provisional fixed partial dentures were removed (Figure 10), ovate pontic sites were prepared using a teardrop-shaped diamond bur (Figure 11), and the sites were sounded to confirm that there was at least 2 mm from the base of the pontic site to the alveolar bone (Figure 12). The fixed partial dentures were cemented, and the postoperative healing was uneventful (Figure 13).
Conclusion
Although the use of implant-supported crowns in the anterior region has become more predictable, the use of pontics in conjunction with both natural teeth and implants is still common in restorative dentistry. When an ovate pontic design is selected and the site is properly prepared to meet prosthetic biologic width requirements, superior esthetics can be achieved with traditional fixed partial dentures.
Acknowledgement
The author would like to thank LeBeau Dental Laboratory in Renton, Washington, for the fabrication of the final fixed partial dentures in the case report.
Queries regarding this course may be submitted to authorqueries@broadcastmed.com
About the Author
J. William Robbins, DDS, MA
Clinical Professor
School of Dentistry
University of Texas Health Science Center at San Antonio
San Antonio, Texas
Private Practice
San Antonio, Texas
References
1. Salama H, Salama MA, Garber D, Adar P. The interproximal height of bone: a guidepost to predictable aesthetic strategies and soft tissue contours in anterior tooth replacement. Pract Periodontics Aesthet Dent. 1998;10(9):1131-1141.
2. Seibert JS. Reconstruction of deformed, partially edentulous ridges, using full thickness onlay grafts. Part I. Technique and wound healing. Compend Contin Educ Dent. 1983;4(5):437-453.
3. Bienz SP, Sailer I, Sanz-Martín I, et al. Volumetric changes at pontic sites with or without soft tissue grafting: a controlled clinical study with a 10-year follow-up. J Clin Periodontol. 2017;44(2):178-184.
4. Abrams L. Augmentation of the deformed residual edentulous ridge for fixed prosthesis. Compend Contin Educ Dent. 1980;1(3):205-214.
5. Tripodakis AP, Constantinides A. Tissue response under hyperpressure from convex pontics. Int J Periodontics Restorative Dent. 1990;10(5):408-414.
6. Kaufman Z, Paranhos KS. Digitally designed ovate pontic as a predictable procedure to improve accuracy, hygiene, esthetics. Compend Contin Educ Dent. 2022;43(4):226-230.
7. Korman RP. Enhancing esthetics with a fixed prosthesis utilizing an innovative pontic design and periodontal plastic surgery. J Esthet Restor Dent. 2015;27(1):13-28.
8. Liu CLS. Use of a modified ovate pontic in areas of ridge defects: a report of two cases. J Esthet Restor Dent. 2004;16(5):273-283.
9. Gomez-Meda R, Esquivel J. The flat and step (F and S) pontics. Novel pontic designs for periodontally reconstructed sites [published online ahead of print March 18, 2022]. J Esthet Restor Dent. 2022. doi. 10.1111/jerd.12905.
10. Pozzi A, Tallarico M, Moy PK. The implant biologic pontic designed interface: description of the technique and cone-beam computed tomography evaluation. Clin Implant Dent Relat Res. 2015;17(Suppl 2):e711-e720.
11. Gargiulo AW, Wentz FM, Orban B. Dimensions and relations of the dentogingival junction in humans. J Periodontol. 1961;32(3):261-267.
12. Vacek JS, Gher ME, Assad DA, et al. The dimensions of the human dentogingival junction. Int J Periodontics Restorative Dent. 1994;14(2):154-165.
13. Farmer M, Darby I. Ridge dimension changes following single-tooth extraction in the aesthetic zone. Clin Oral Implants Res. 2014;25(2):272-277.
14. Dylina TJ. Contour determination for ovate pontics. J Prosthet Dent. 1999;82(2):136-142.
15. Weisgold AS, Arnoux JP, Lu J. Single-tooth anterior implant: a word of caution. Part 1. J Esthet Restor Dent. 1997:9(5):225-233.
16. Kois JC. Altering gingival levels: the restorative connection part 1: biologic variables. J Esthet Restor Dent. 1994;6(1):3-9.
17. Bakshi M, Tarnow D, Bittner N. Changes in ridge dimension with pontics immediately placed at extraction sites: a pilot study. Int J Periodontics Resotrative Dent. 2018;38(4):541-547.