

Exceeding Esthetic Expectations
Proven prosthodontic techniques to restore natural esthetics and function in a complete denture patient.
By Robert Kreyer, CDT
An esthetic smile powerfully affects a person’s self-confidence at work or in daily life. The goal in prosthodontics is to exceed patient expectations by providing a prosthesis that contributes to a happy, positive state of mind.
The middle-aged female patient in this case works with the public, and her smile is very critical to her success. The original prosthesis (Figure 1 and Figure 2) was only a few years old, but impaired the patient’s ability and desire to express herself freely with an esthetic smile.
Anterior esthetics is a critical factor when trying to understand a patient’s expectations and desired results. Denture tooth forms should be selected according to facial features, such as the nose (ala to ala measurement) and the lips (incisive papilla measurement), in order to create harmony when the patient is smiling, speaking, and laughing.1,2
The previous prosthetic occlusion was set in severe Class II relationship with an extreme horizontal and vertical overlap. The vertical overlap, combined with the selection of a maxillary anterior tooth that was too short, created a noticeable gingival display extending from teeth Nos. 6 through 11. To eliminate the “gummy” gingival display, a papillameter was used to determine the exact negative space from incisive papilla to maxillary lip at rest and high smile line.
To determine the proper horizontal or labial position of the maxillary anteriors, an intraoral tracing was made to establish a physiological centric relationship and to determine the proper amount of horizontal overlap (Figure 3 and Figure 4 ).
The impressions were then separated, boxed in alginate, and poured to create proper working master casts and then mounted on a Stratos® 100 articulator (Ivoclar Vivadent, www.ivoclarvivadent.com) (Figure 5 and Figure 6 ). A cast analysis determined the residual ridge relationship and delineated proper tooth placement.
Phonares™ denture teeth (Ivoclar Vivadent) were then arranged for a try-in, verified, and the final gingival contours were waxed for flasking (Figure 7, Figure 8, Figure 9 and Figure 10). The dentures were then invested for the Ivocap continuous press injection system (Ivoclar Vivadent) and prepared for gingival characterization (Figure 11).
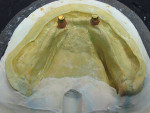
The Preci Clix attachment (Preat Coporation, www.preat.com) was placed on the model analog and blocked out before injection to prevent acrylic resin from being pressed into the matrix (Figure 12 and Figure 13). Characterization of the gingival base can be accomplished either with an intrinsic (inside the mold or negative process) or extrinsic (outside the mold or positive process) technique. For this case, the intrinsic technique was used for the gingival base. The colors were applied with a brush in stages, starting with the interdental papilla and extending toward the peripheral border or mucosal tissue where the color would be more vascular or reddish (Figure 14, Figure 15, Figure 16 and Figure 17).
After polymerization, the molds were cooled for 30 minutes then deflasked. After deflasking, the processed acrylic-resin dentures were left on the master casts and placed back on the Stratos 100 articulator to evaluate occlusal contacts and correct any processing errors (Figure 18, Figure 19 and Figure 20).
A very important advantage of the Ivocap continuous press injection system is that the closed flask process prevents any increase in vertical dimension. This can be verified by placing articulating ribbon between the incisal pin and the table. A red contact mark is evident where the incisal pin touches the table (Figure 21 and Figure 22).
After carefully removing the processing stone casts from the acrylic resin dentures, the intaglio surface was inspected. The denture surface should be very clean with no voids or stone in the resin, often caused by improper application of separator after wax elimination (Figure 23 and Figure 24).
The dentures were then finished and polished, achieving a natural appearance within the biofunctional denture space of the oral environment (Figure 25).
Conclusion
The first thing patients want to see is how the new prosthesis looks and how it changes their personal appearance. The patient wanted a softer, more youthful esthetic smile in harmony with her face. The flat facial surface and even incisal edges of the previous prosthesis gave the patient an aged appearance compared to the open incisal embrasures of the new prosthesis, which provide the youthful appearance the patient desired (Figure 26).
When comparing the high smile line between the two prostheses, the previous prosthesis displayed excessive gingival tissue and interdental papillae when the patient smiled. In comparison, the new prosthesis displays an esthetic gingival margin when the maxillary lip is at full smile (high lip line), showing teeth not tissue (Figure 27).
It also is always preferable to use various shades of denture teeth to provide a more natural look. The previous prosthesis had a monochromatic appearance compared to the new prosthesis in which shade A1 was used for the centrals, A2 for the laterals, and A3 for the canines. The pre-molars were shade A2 with a slight stain on the occlusal third. The molars were shade A3 to break up the color. The cervicals of the canines and the laterals have a slight ocher stain to add to the illusion. What truly makes a difference is exposing the full mesial aspect of the canines so the patient shows this full-body tooth during an esthetic smile.
The goal in prosthodontics is to restore function, enhance esthetics, and preserve health. Laboratory professionals can consistently exceed esthetic expectations by applying these principles in their prosthetic techniques.
References
1. Pound E. Lost—Fine arts in the fallacy of the ridges. J Prosthet Dent. 1954;4(1):6-16.
2. Pound E. Personalized denture procedures: dentist’s manual. Anaheim, CA: Denar Corp; 1973.
About the Author
Robert Kreyer, CDT
Director of Removable Prosthodontics
Microdental/DTI
Dublin, California


 www.
www.


