Esthetic Dentistry’s Ultimate Challenge: The Undetectable Single Maxillary Central
Michelle Hrnchar, DDS
Imagine this scenario: A patient comes in with a badly fractured tooth, No. 9, in his or her otherwise natural, minimally restored dentition. The dentist decides that a crown is necessary to restore the tooth, and starts preparing the tooth. The last thing done before the provisional is made is to “take a shade.” Various tabs are held up to the tooth, until it is decided that one looks close to the color of the adjacent teeth (the chairside assistant’s opinion is part of this process). The assistant or the dentist fills out the laboratory prescription, lists the shade in the box included for this purpose, and comments that there is “a little mottling in the incisal third, Minimal translucency.” When the patient returns for the delivery appointment, the crown is tried in. The patient looks in the mirror, figures that it is as close as it can get, and accepts the restoration. The crown is bonded to place, and everyone is happy with “close enough.”
For many, this scenario is all too easy to envision. Matching a single restoration to blend imperceptibly into a natural dentition can be an elusive task. It does not matter how great the preparation is, or what state-of-the-art materials are used, the restoration is a failure if it is the first thing noticed when the patient smiles.
In contrast to a full cosmetic case, where 16 to 20 teeth are prepared and the dentist has complete control over esthetics, restoring a single tooth in the esthetic zone can present a multitude of challenges. By its very nature, a single-tooth restoration limits the degree of modification that can be imposed on its surroundings (the opposing and adjacent teeth). Each case is unique, and is an artistic endeavor for the dental team. Successful shade matching in these cases is truly a combination of art and science, and takes an exceptional level of communication among the entire dental team. What used to be limited to just “taking a shade” has evolved into an in-depth exchange of subtle information, much of which can be gathered by an experienced dental assistant. Dental assistants must understand the language of color and be aware of the tools available to aid in shade matching.
This article will give assistants the background needed to maximize their contribution to their dental team, and help to ensure that each case delivered is a true esthetic success.
THE PHENOMENON OF COLOR
Color is the energy of visible light, and it is measured in wavelengths. When it encounters an object, light is reflected, refracted, or absorbed; the reflection is perceived by the human eye as the color of the object. Special cells in the human eye are sensitive to this energy, which then is relayed to the brain and interpreted as color. It is well documented that women perceive color much better than men do, because women possess two copies of the gene responsible for color vision. According to the American Academy of Ophthalmology, 8% of men are color blind, and only 0.5% of women exhibit this condition.1 In addition, many factors can influence how color is perceived, both internal (age, genetics, fatigue) and external (lighting, other distractions in the surrounding environment). Taking all of this into consideration, it is easy to see how color perception is a highly subjective, individualized experience.2
In an attempt to give a more concrete definition to color, the Munsell system was developed in the early 1900s and is still in use today. It breaks color down into three components: hue, chroma, and value3 (Figure 1). Hue, which represents the actual wavelength of the light, is what most people think of as the “color.” There are five principle hues: red, yellow, green, blue, and purple. Chroma refers to the saturation or dilution of the hue. This is most easily imagined by thinking of the difference between sky blue and royal blue—same color, but much more intensely represented in the “darker” color. The last parameter, value, is how much grey is present in the sample. Value is what gives lightness or darkness to the color, described as “high” or “low” (white is the highest value possible, black is the lowest). The human eye is more sensitive to value than to chroma or hue—the retina has 20 times the number of receptors (called “rods”) to determine black and white as it does receptors (called “cones”) to see color.4 Not surprisingly, of all the remakes because of improper shade selection, as high as 75% fail because the value is incorrect.5
SHADE GUIDES
Shade guides were initially developed to represent the most typical colors of natural teeth. Familiar to any assistant in a restorative practice, many shade guides have been distributed by various porcelain manufacturers as samples of their available shades. Although originally the only method for communication of shades, they are still quite useful as a stable reference point from which to begin the process of shade taking.
The most common system, the Vita® Classic shade guide (Vident, https://www.vident.com), breaks down shades into four different hue groups: A (reddish brown), B (reddish yellow), C (gray), and D (reddish gray). Each hue group is further divided into four chroma levels (1, 2, 3, and 4), each with increasing saturation.6 To use the guide, the assistant simply scans the shade tabs against the patient’s teeth, first by hue, then by chroma within that group.
Vita more recently developed the 3D-Master® shade guide to incorporate the third (and most important) element—value. In this system, the value is first selected from five families; then chroma, and finally hue. Because patients are most likely to notice discrepancies in value, this new system places the highest priority on that characteristic.
Shade taking using a comparison-based method has limitations. The total color effect of natural teeth is a result of a combination of light reflected from the enamel surface and light scattered and reflected from within the enamel and dentin.7 Although some teeth are fairly monochromatic, multiple hues, chromas, and values typically exist within an individual tooth (Figure 2). Several shades may need to be taken to correspond to the cervical, body, and incisal areas of the tooth. To communicate the uniqueness of a tooth, a clinician needs to draw a “map” with an artistic rendering of where those characteristics exist within the tooth. Therefore, the term “shade mapping” has begun to replace the term “shade taking.”
With traditional shade taking, the ambient lighting conditions also must be considered. Dentists are taught in school that the “perfect” lighting condition for shade taking is “north sky daylight,” meaning that standard operatory light is one of the worst for shade taking. Color-corrected fluorescent bulbs have been developed that acceptably reproduce natural lighting, and should be in all treatment rooms. Recently several manufacturers have developed devices to ensure good lighting in the immediate vicinity of the tooth being restored. The DEMETRON Shade Light (Kerr Corporation, https://www.kerrdental.com) is a handheld light, with a window for viewing shades under its “perfectly neutral” light temperature of 6,500°K. The Rite·lite™ (AdDent, Inc, https://www.addent.com) and the Shade Wand (Authentic Dental Laboratory Inc) work in the same manner, but provide a light temperature of 5,500°K. These improvements over operatory light are still subject to clinicians’ interpretation of color, as well as the limitations of their vocabulary and artistic skills to communicate with the laboratory.
PHOTOGRAPHY
Because all members of the dental team do not possess the same level of drawing ability, the use of photographic images is an essential part of laboratory communication. Photographs enable the laboratory technician to get a better idea of how the restoration should look, without having to rely on a clinician’s artistic rendering. Elements that are difficult to describe verbally, such as translucency (Figure 3) and surface texture (Figure 4), can be effectively conveyed. Placing a shade tab near the tooth in the photograph can help minimize any color distortion from exposure variation or lighting conditions (Figure 5 and Figure 6). The laboratory technician can reference the pictured tab and gauge the accuracy of the color in the image.
Many books have been written on dental photography, with varying opinions on the best equipment, lighting, and techniques that influence the final image.8,9 Although there are many cameras to choose from, a digital single-lens reflex (SLR) camera with a macro lens and flash attachment (such as the Canon 40D, Canon USA Inc, https://www.canon.com; Fuji FinePix S5 Pro, FujiFilm USA Inc, https://www.fujifilm.com; or Nikon D80, Nikon Inc, https://www.nikon.com) is user-friendly and considered to provide excellent images. The initial investment can be substantial, but digital photography has significantly cut the cost of producing, manipulating, and storing images compared with 35 mm film/slide systems.
Additionally, images can be sent almost instantaneously to a remote laboratory, so that a technician can be in a “virtual operatory” with the patient, dentist, and assistant.
Camera technology cannot always capture everything the human eye perceives, but digital imaging goes a long way toward improving the quality of information exchanged between the clinical team and the dental laboratory. All assistants should become comfortable with their practice’s camera because it generally falls within their duties to obtain and verify this important information. Assistants take preoperative photographs (Figure 7 and Figure 8) as well as images of the finished preparation (Figure 9, Figure 10, Figure 11), so that the laboratory technician can assess the dentin shade the restoration may need to mask. Assistants can e-mail the images to the laboratory or include them in a digital format (CD, memory card, or zip drive) with the outgoing case. The finished case should be recorded in image form as well. The images can be maintained as part of the patient’s record or for future use in before-and-after comparisons.
NEW TECHNOLOGIES
The most active area of development incorporates technology to standardize shade taking and shade mapping. During the 1990s, computers began to help determine shade, and then transfer that data to the laboratory technician. The basic idea behind these new devices is to use objective analysis of a computer to interpret data from an image—taken under ideal optical conditions—then use that analysis to create a perfect shade map.10 When used properly, these “artificial eyes” not only bring critical information from the treatment chair to the laboratory bench, but also can be used by the laboratory technician to verify the characteristics of the completed restoration (by using the same imaging system) before returning it to the dental office.
Digital shade-mapping software is a simple method of communicating shade information to the laboratory technician. Because these software systems usually are owned and used by dental laboratories, they offer the dental team the benefits of digital shade mapping without the need to learn new technology. Dental assistants only need to send the laboratory the clinical digital photographs. For example, ClearMatch® (Clarity Dental Corp, https://www.clearmatch.com) is a unique software program that uses images captured with a digital camera. It works through a process called “normalization,” by which unknown colors (the tooth) are compared with known reference colors that are seen within the same image. The clinician need not purchase any additional equipment; all that is needed to use the program is a shade tab (A2 from the Vita Classical shade guide works well, as it has exact parallels in other shade systems), and a small black and-white reference tab (similar to those seen as measurement scales in medical photographs) (Figure 12). When the laboratory technician adds the information into the program, the software uses these known values to calibrate itself and produce a digital map that represents the characteristics of the tooth (ie, hue, chroma, value, and translucency).
Because of the “normalization” process, the program can correct for lighting conditions and camera color characteristics, then present the data according to any standard shade system. Any maps of the tooth can be returned to the dentist along with the finished restoration to be kept in the patient’s file to be used as reference if any additional restorations or repairs are needed.
A spectrophotometer measures light wavelengths that reflect off a tooth using fiber-optics; this information then is analyzed and compared with various standard shade guides stored in the computer’s database.11,12 It measures hue, chroma, and value, then presents that data as a digital shade map of the tooth in the shade system the user chooses.
These systems gather data by use of a sensor, which is held up in close vicinity of the tooth. The captured information is processed by software, then sent to the dental laboratory either electronically or by including a printout or disc with the case. Each of the following systems varies somewhat (some are self-contained, others use a sensor that is hard-wired to a computer), but all use a similar technology to provide the dental team enhanced information about the characteristics of the tooth that need to be reproduced in the final restoration.
SpectroShade™ Micro (MHT Optic Research AG, https://www.mht.ch) was the first optical device of this type. It needs a dedicated computer, which connects via a cable to two tiny digital cameras contained in a small probe that can be used intraorally. Another new spectrophotometer, Crystaleye® (Olympus, https://www.olympus.com), ascertains tooth colors from photographs taken inside the oral cavity, which is shielded from external light. Then, the laboratory can photograph the prostheses with special equipment that eliminates external light, providing a true-to-life view of the restoration. The software supplied with the system (Crystaleye® Application Master) provides a simple method to send the information to the laboratory electronically (Figure 13). Most recently, a compact spectrophotometer, Vita® EasyShade® (Vident), has become available. This handheld unit has an intraoral handpiece connected to a small display. It is designed to be a “shade-selection” tool and provides either a single base shade or three separate (gingival, middle, incisal) shades (Figure 14). Because this system uses the Vita Classical and Vitapan 3-D Master shades, assistants should check if it is compatible with their office’s porcelain shade systems.
Colorimetry
A colorimeter is a method by which an isolated, independent light source is combined with a shade analyzer to measure the wavelength (color) of a sample.12 Some popular units on the market include ShadeScan™ (Cynovad, Saint-Laurent, Quebec) and ShadeVision™ (X-Rite, Inc, https://www.xrite.com). Most are cordless, have a small light-emitting diode screen, and (using a disposable tip) are placed directly against the tooth to be matched (Figure 15). The data can obtained quickly (in less than 10 seconds), and is then downloaded to a computer for use. A software program then can create numerous types of shade maps (ie, hue, chroma, value, translucency, and, depending on the system, surface characteristics). This data can be e-mailed to the laboratory, or printed out as detailed maps. These devices are user-friendly and are supported by numerous shade guides and porcelain systems.
CONCLUSION
Today’s dental assistant is fortunate to be a member of a profession with rapidly expanding possibilities. New materials make the physical tasks that fall into their hands easier, and new developments in restorative materials allow for a more natural-looking restoration than was possible before. By being well informed on how to use all available technology, a dental assistant can take what can be an exercise in frustration, and make it an efficient, satisfying experience for both the patient and the dental team. Although dental practice laws vary from state to state, sometimes limiting what clinical duties are delegated to the dental assistant, they ultimately have the ability to gather some of the most crucial information to ensure the most esthetic result—the visual characteristics of the tooth. Once limited to matching a shade tab to a tooth and verbal descriptions, the possibilities for obtaining precise and detailed visual information continue to expand.
From still photography with digital SLR cameras to the image capture for computer-driven technologies of the colorimeter and spectrophotometer, the dental assistant needs to be familiar with the multitude of ways to obtain visual information about the tooth being restored. Whether the clinical team uses their eyes or a computer to select the shade, good communication is paramount for guiding the laboratory technician to create a natural-looking crown.
Combining several methods is often the key to painting the most accurate picture for the technician. There is no definitive, single technique or method that will work every time for every clinical team. However, keeping up-to-date on all the available data-gathering and communication methods will help to ensure a result considered exemplary by both the patient and the dental team.
REFERENCES
1. Diggins D. Color vision. Techniques Monthly Electronic Newsletter. May 2006. Available at: https://commonspot.aao.org/aaoesite/promo/techniques_200605.cfm. Accessed April 30, 2008.
2. Chu SJ. Precision shade technology: contemporary strategies in shade selection. Pract Proced in Aesthet Dent. 2002;14(1):79-84.
3. MacEvoy B. Modern Color Models—Munsell Color System. Available at: https://handprint.com/HP/WCL/color7.html#MUNSELL.
4. Mendelson MR. Effective shade taking: a step-by-step guide for accuracy. Contemporary Dental Assisting. 2006;3(4):40-43.
5. Sagara J. Shade matching for today’s dentistry. Dental Economics. 2002;92(1):62-68.
6. McArdle BF. Shade matching for single indirect restorations using a remote laboratory. Contemporary Esthetics. 2006;10(8): 44-53.
7. Johnston WM, Kao EC. Assessment and appearance match by visual observation and clinical colorimetry. J Dent Res. 1989;68(5):819-822.
8. Bengel W. Mastering Digital Dental Photography. Carol Stream, IL: Quintessence Publishing; 2006.
9. Muia PJ. Esthetic Restorations: Improved Dentist-Laboratory Communication. Carol Stream, IL: Quintessence Books; 1993.
10. Flucke J. Computerized tools aid in lab communications. Dental Practice Report. 2002.
11. Paul S, Peter A, Peitrobon N, et al. Visual and spectrophotometric shade analysis of human teeth. J Dent Res. 2002;81(8):578-582.
12. Vita Easyshade [instruction booklet]. Doc No. 20030915-1. Morton Grove, IL: JJL Technologies LLC; 2003.
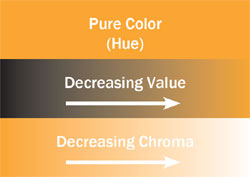 Figure 1 For each hue, the chroma and value affect the interpretation of the “color.” | 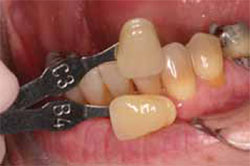 Figure 2 The incisal two thirds of this tooth closely match shade C3 while the cervical third matches B4. | ||||||
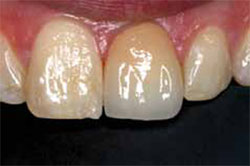 Figure 3 The left incisor exhibits translucency. The gray color of the incisal third is caused by the black background being seen through the tooth. | 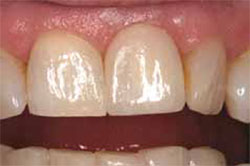 Figure 4 The surface texture of the incisors is best described through photographs. | ||||||
 Figure 5 | 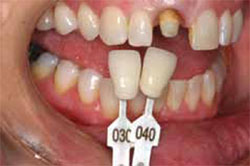 Figure 6 | ||||||
| Figure 5 and Figure 6 The shade tab in the photograph allows the laboratory technician to gauge the true color of the teeth and the preparations. | |||||||
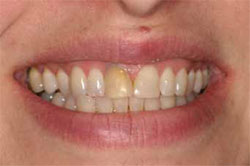 Figure 7 | 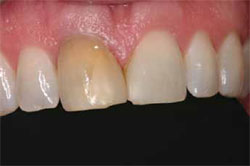 Figure 8 | ||||||
| Figure 7 and Figure 8 Pretreatment photographs should include a smile view and a buccal view. | |||||||
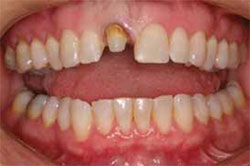 Figure 9 | 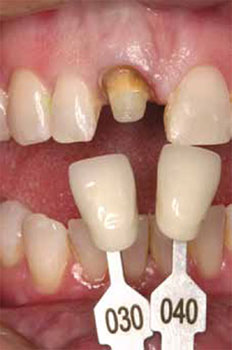 Figure 11 | ||||||
 Figure 10 | |||||||
| Figure 9 through Figure 11 Photographs of the preparation should include a view with surrounding dentition, a close-up view of the preparation, and a view with shade tabs to provide a color reference. | |||||||
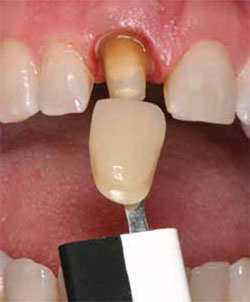 Figure 12 The black-and-white strip that accompanies the shade tab allows the software to normalize the image, correcting for lighting conditions and camera color characteristics. | 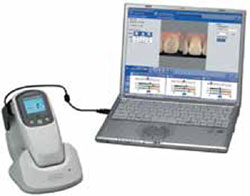 Figure 13 The Crystaleye software breaks down tooth color into digital information and draws a shade map, which aids in the creation of a precise restoration (image courtesy of Olympus). | ||||||
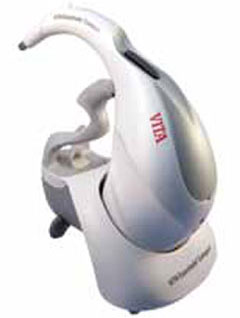 Figure 14 The Vita EasyShade provides an easy readout of a tooth’s shades in the form of digital information (image courtesy of Vident). |  Figure 15 The ShadeVision, an easy-to-use handheld device, is placed directly against the tooth to be matched and the software converts the digital information into a shade map, which can be used by a technician to create a precise restoration (image courtesy of X-Rite, Inc). | ||||||
| |||||||