
Predictable Smile Design with Brilliant Color
Luke Kahng, CDT
To have the best six-unit anterior cosmetic design, it is well worth spending time in a three-way consultation between the patient, dentist, and technician. The patient will be better educated as to why contour opacity is essential for color and proper value (it should be bright but not strong) and why high translucency will create too much of a gray effect. All of these eventualities can be noted when there is open communication between the involved parties. Additionally, a blueprint of what is to follow can be created. Every angle of the case can also be discussed. Design, proper occlusion, and function can also be addressed at this time.
CASE PRESENTATION
The patient, a woman in her mid 30s, presented with dissatisfaction about the color and general appearance of her six-unit anterior veneers, which she thought had a “bluish tint.” She was willing to change her smile and give it a more natural look. She and her clinician had been back and forth three times with another laboratory trying to custom match her shade for a new veneer on tooth No. 9 but had just about given up. The gray hue in her color was very difficult to match. As an added complication, the patient lived out-of-state, so the time spent with her was of the essence in terms of processing her information. X-rays were taken but deemed non-contributory. The tissue condition was good and the patient had no known allergies.
During a custom shading appointment at the author’s laboratory, the dentist, patient, and technician talked about tooth No. 9 as well as the patient’s adjacent teeth. Tooth No. 9 was noticeably cracking, which was a concern, and tooth No. 10 had a vertical micro-crack. The discussion moved toward restoring these three teeth, but then No. 7 would have to be involved for balance. Because they would still be trying to match a gray color that the patient did not care for, the clinician suggested that teeth Nos. 6 and 11 be included in the preparation. Color and appearance could then all be changed at the same time, with consideration also being given for longevity. Through this three-way conversation, the patient, clinician, and the technician decided upon full-preparation veneers for the six anterior teeth.
Upon reviewing the case, the technician knew that to achieve the look the patient hoped to capture, he had some work to do to change tooth shape, symmetry, and size. For the illusion of less width and increased height, he needed to examine the patient and her impressions carefully and come up with a design that fulfilled her vision. Also, with the involvement of teeth Nos. 6 and 11, it would be possible to change their incisal edge and facial over-contouring. For her part, the patient was interested in changing her prevalent gray color and the masculine appearance she felt her smile presented. With all six teeth implicated, the technician would be able to reach predictable results involving both design and color.
MAKING THE CASE
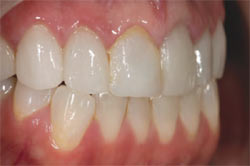
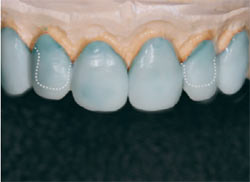
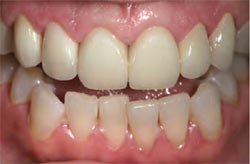
In the preoperative photograph (Figure 1), note the discoloration at the gingival margin because of the C-1 zone. It was also clear that the patient’s teeth were wider then they are long, which gave them a “boxy” or squared-off appearance. A lateral view demonstrates the need to create gingival embrasure form between teeth Nos. 6 and 7 and also between teeth Nos. 7 and 8 (Figure 2). The author is a strong advocate of communication between the dentist, the patient, and the technician. In this vein, he and the dentist wanted the patient to be aware of her possible choices when deciding upon the shape of her teeth. In general, the possibilities for smile designs are:
- Square/Square: Involves the centrals and the laterals—all square in shape. Tends to be a man’s type of shape more often than a woman’s; more masculine in appearance.
- Square-Round/Square-Round: The centrals are square-round and laterals are square-round, also. This shape is very common. Most patients are satisfied with this natural tooth shape.
- Square-Round/Round: The centrals are square-round, laterals are round.
- Prominent: Mainly involves the central teeth. The laterals are then round in appearance.
- Round/Round: All of the anterior teeth are implicated.
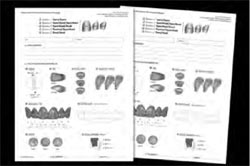
This particular patient preferred the square-round/square-round shape. The case clinician filled in the Design Description sheet (Figure 3) accordingly,1 paying close attention to the following:
- Midline
- Lobe
- Facial aspect
- Emergence profile
- Measurable size (very important)
- Desired shade
- Texture
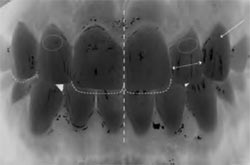
In the computer image of the patient’s digital photograph (Figure 4), several changes that the clinician, patient, and technician planned to implement are illustrated: 1
- Increase the incisal cusp tip of tooth No. 6 and reposition tooth No. 7’s height of contour and lobe. The long axis would be changed, as noted in the two circles drawn on the laterals (teeth Nos. 7 and 10).
- Increase the incisal length of teeth Nos. 8 and 9 by 1 mm and, in the process, decrease the mesial-distal ratio contour. Also, between teeth Nos. 8 and 9, embrasure form would be defined and definite mesial lobes would be created.
- Tooth No. 10 would have changes to its incisal edge and be given a different illusion by repositioning the mesial-distal ratio.
- The arrow pointing to the large area of tooth No. 11 notes a need for reduction to eliminate facial bulkiness.
During her next office visit, the clinician anesthetized the patient then prepared the teeth by removing the old veneers with Brasseler diamonds (Brasseler USA, Savannah, GA), finishing with a diamond veneer preparation bur (Figure 5). He took full upper and lower impressions with Flexitime® light- and heavy-body material (Heraeus, Armonk, NY), then fabricated six hand-sculpted direct-bond provisionals with B-1 Durafil Bisco Bond™ (Bisco, Schaumburg, IL), and cemented with Prevue Try-In Clear cement (Cosmedent, Chicago, IL).
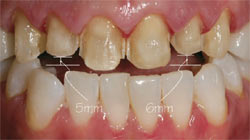
The technician modified the veneer design for the laterals by increasing the incisal height: 5 mm for tooth No. 7 and 6 mm for tooth No. 10. This increase in height had some impact on material choice. When considering longevity, the author knows that feldspathic porcelain, while beautiful, is not as durable as pressed ceramic. It does not require a wax frame design, only a porcelain understructure. At its best, then, it has support strength of up to 2 mm and, in this patient’s case, would definitely be subject to cracking because there was too much spare room in the prepared area. And, knowing that the laterals have particularly small roots, they need the extra-strength support a pressed ceramic material, with wax understructure, can provide.2
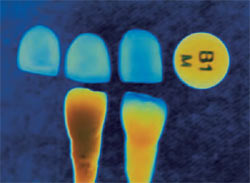
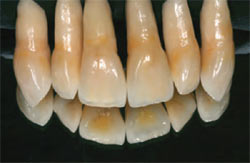
As a laboratory test3 with a GC Initial I.Q.™ B1 ingot (GC America, Alsip, IL), the technician demonstrates three different colors with pressed ceramic veneers (Figure 6). On the photograph’s left is a natural tooth, and on the right, a technician-fabricated tooth. The author performed these laboratory tests and experiments to help determine the proper opacity, translucency, and bright-but-not-high value, for this patient.
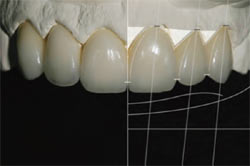
The laboratory’s wax-up design (Figure 7) increased the incisal edge to provide support for the final porcelain, especially the lateral teeth, as discussed.
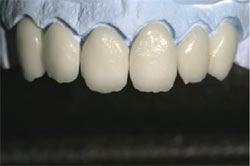
GC Initial IQ is a feldspar-based pressable ceramic for conventional porcelain alloys with pre-blended ingots (CTE/WAK range, 13.8 to 14.9).4 Pictured in Figure 8 are the fabricated veneers’ understructures, with 50% opacity and 50% translucency. After divesting with aluminum oxide or glass bead and fitting to the die, the veneers’ final contour was checked before the porcelain powder was applied (Figure 9). Low-fusing porcelain powder was applied to create dentin and is shown on the model (Figure 10). After the first bake at 780°C, with a full vacuum, the restorations were again displayed on the model (Figure 11).
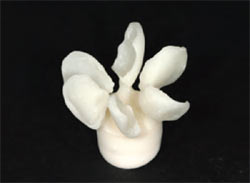
The author, in the interest of education and constantly improving his technique, has created natural teeth from root to completion (Figure 12). By mimicking natural teeth design, the author also continues to learn proper contouring with multi-coloring (see Figure 5). To confirm the best possible esthetics, the following should be checked: interdental closure, tooth axis, zenith of the gingival contour, relative tooth dimensions, basic features of tooth form and tooth characterization, surface texture, and color.1
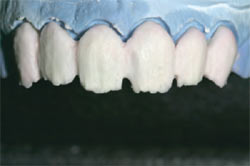
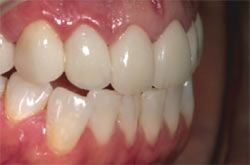
With the final restorations on the model (Figure 13), the author continued his symmetry and esthetic checklist by measuring the mid-line, the incisal edge configuration, the balance of the gingival levels, and teeth angulation. A lateral view demonstrates that the harmony of color and the square/round shape the patient sought had been achieved (Figure 14), with final cementation by the clinician. In the interest of maintaining stable color, the veneers were bonded with Clear Insure Lite (Cosmedent) which “contains two different viscosities, both uniquely formulated. One viscosity provides easy cleanup for veneers while the other offers increased flowability to low marginal film thickness.”5
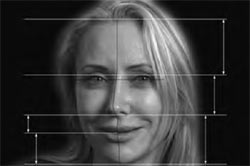
Figure 15 is a full, retracted front view demonstrating the patient’s predictable, new smile. By segmenting the face into three separate zones, the author broke down the overall scope of her appearance and more easily diagnosed her correct teeth shape, contouring, and symmetry (Figure 16). Through this process, he was able to establish “esthetic balance.” However, facial proportions are usually imperfect; in fact, few faces are absolutely symmetrical. These deviations are what give each person’s face its character and may be called “perfect imperfections.” According to Gebhard, “...the guidelines help us to better analyze a face’s individuality. The focus is put on identical and differing parts of the face and the findings used to come up to esthetic requirements.”6 The postoperative portrait with a full facial view proves the balanced coordination between her teeth, lips, eyes, and face. In fact, “Individuality is the quality or character of a particular person or thing that distinguishes them from others of the same kind.”6 This patient’s confidence in her individuality shines through her new smile.
CONCLUSION
In this case, the patient could not express exactly what was bothering her about her smile. She knew the color was wrong, but did not know how to describe what else she did not care for. Her answer to each question was, “I don’t know. What do you think?” By enumerating the possibilities for her through the use of communication tools and photographs, the dentist and technician were able to help the patient organize her thoughts about her dislikes and, in turn, offer her feasible solutions. Everyone wins when they all have a say in what is expected and what is actually possible. There are no unwanted surprises for the patient, the clinician, or the technician when the lines of communication remain open each step of the way. What is the final result? A predictable smile with brilliant color.
ACKNOWLEDGEMENT
Special thanks to the case clinician, Nicholas P. Primiano, DDS, Naperville, Illinois.
References
1. Ahmad I. Digital and Conventional Dental Photography: A Practical Clinical Manual. Carol Stream, IL: Quintessence Publishing Company; 2004: 9-15.2. Spear F. Course Book: Esthetic Techniques and Materials. Seattle Institute for Advanced Dental Education; 2002:14.
3. G.C. Europe N. V. Create your world with Initial from G.C. Head Office Interleuvenlaan 13 B-3001 Leuven; 2007:1-2.
4. Magne P, Belser U. Bonded Porcelain Restorations in the Anterior Dentition: A Biomimetic Approach. Berlin, Germany: Quintessence; 2002:58-59.
5. Cosmedent, Inc. Product Reviews. “Resin Cements: Insure Lite.” Available at: www.cosmedent.com/index.asp. Accessed May 22, 2008.
6. Gebhard W. A comprehensive approach for restoring esthetics and function in fixed prosthodontics. Quintessence Dent Tech. 2003;26:34-44.
 |  | |
| Figure 1 Preoperative photograph. | Figure 2 A lateral view of the patient’s smile. | |
 |  | |
| Figure 3 The Design Description worksheets. | Figure 4 A computer image of the patient's photograph, with changes by the author. | |
 |  | |
| Figure 5 The clinician’s preparation design. | Figure 6 Laboratory test with B1 ingot. | |
 |  | |
| Figure 7 Wax design by the laboratory. | Figure 8 The ceramic veneers’ understructure. | |
 |  | |
| Figure 9 Contour check before porcelain powder is applied. | Figure 10 Low-fusing porcelain powder is applied before the first bake. | |
 |  | |
| Figure 11 Appearance after the first bake. | Figure 12 Technician-created teeth—from root to completion. | |
 |  | |
| Figure 13 Final restorations displayed on the model. | Figure 14 Postoperative lateral view. | |
 |  | |
| Figure 15 Retracted, post-cementation view. | Figure 16 Facial proportion segmentation. | |
| About the Author | ||
 Luke Kahng, CDT Luke Kahng, CDT Founder and Owner LSK121 Oral Prosthetics Naperville, Illinois luke@lsk121.com | ||

