
A Simple Technique to Create an Interim Provisional Restoration
Ronald E. Goldstein
Over the past decade, direct-to-consumer marketing regarding advances in esthetic dentistry has created a greater demand for smile transformations than ever before.1 The emphasis has changed from patients seeking one or two restorations to patients desiring a whole-mouth reconstruction, which may involve eight to 12 restorations, all in an effort to dramatically change their smiles.
It is usually a challenge for a patient to feel immediately comfortable with his or her new smile. One of the best ways to gain patient acceptance of the new smile is to place provisional restorations that mimic the final ceramic restoration in both tooth form and color.2-5 If this treatment consists of an indirect temporary, the treatment does take a considerable amount of time, so the question then becomes how to temporarily care for the prepared teeth while these provisional restorations are being constructed in the laboratory. This article offers a new technique that addresses this need.
Tooth preparation begins with displacing the gingival tissue with cotton cord (Figure 1), a series of impressions (Figure 2 ), and finally making accurate occlusal registrations. In a full-arch restoration case, the provisional restorations are fabricated in our in-house laboratory while the patient is retired to one of our two “comfort rooms.” While waiting for the temporaries, the patient is served a snack or soft lunch. He or she is also able to watch television or DVDs, log-on to a wireless connection, or relax in our sleeper/massage chair.
All of these services during the “down time” contribute to the patient’s comfort and are aimed at making the waiting time as pleasant an experience as possible. However, it is important to note several clinical concerns:
• the patient has no teeth to masticate even soft foods.
• the remaining teeth and gingival tissue may be quite sensitive.
• the sulcular tissue may collapse over the finish line, making it difficult to accurately seat the interim provisional restorations.
In our practice, previous attempts to control sensitivity included using a vacu-form matrix to cover the teeth until the provisional restorations were ready. However, this technique presented the potential of the tissue collapsing over the finish line. More often than not, when the time came to place the provisional restorations a few hours later, there was no longer a visible margin on some of the teeth. As a result, when the temporary was seated, we had to either retract the gingival tissue again before seating the provisional restorations, or the tissue was impinged upon.
TECHNIQUE
One successful solution has been to fabricate an immediate interim temporary restoration. To do this, first make a stone model from the original wax-up (Figure 3 ), and then make a vacu-form matrix of the wax-up. Next, trim the vacu-form matrix carefully, with 1 mm or 2 mm resting on the gingival tissue (Figure 4), which is necessary to obtain a good seal and to help properly seat the matrix. This step is especially helpful if the teeth have been built-up with wax, and thus not permitting a tooth-borne stop for the placement of the matrix. This matrix is also valuable as a try-in over the prepared teeth to make certain there is sufficient clearance all around (Figure 5).
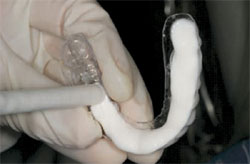
After determining the successful fit of the matrix, use the auto-mixing syringe to inject vinyl polysiloxane (VPS) into the teeth, then carefully and accurately (Figure 6 and Figure 7) seat the matrix over the teeth (Figure 8 ). Next, remove the excess material and allow it to harden. It is important to not remove the interim temporary until it is time to seat the final provisional restoration(s).
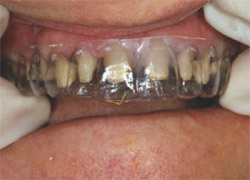
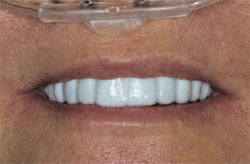
With this new technique, the patient not only has protection from sensitivity, but also is not toothless. Do not underestimate the value of using a tooth-colored material, because this will be the first time the patient can visualize the new restoration (Figure 9 ). The material we have found to esthetically work best for the insertion is Fit Checker (GC America, Alsip, IL) because of its white color, but some may prefer other manufacturers’ VPS syringe. Because the Fit Checker White is extremely bright it also permits the patient to see himself or herself with a much whiter tooth color than the final temporary shade will be. This is important because a patient who had very dark teeth may initially feel uncomfortable when he or she sees such a light shade. So using a very white shade in the interim provisional restoration helps mentally prepare the patient for the final light temporary shade.
Finally, it is important to note that Fit Checker sets rapidly, so load and seat the matrix as quickly as possible.
A SECONDARY FUNCTION
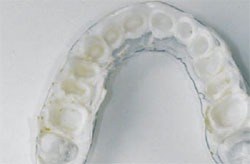
There is another potentially valuable use for the interim temporary restoration, so the interim temporary should be saved after removal (Figure 10 ). At the final seating of full-arch crowns or fixed partial dentures, if using a resin-modified glass-ionomer (RMGI) cement, it is best to cement the crowns in quadrants because of the extremely rapid set time of these types of cements.
The main concern with this technique is the necessity of keeping the RMGI cement off the adjacent abutments—otherwise, it may become difficult to fit the restorations in the adjacent segment. This step is where the interim provisional restoration has a secondary use. Cut off the segment being cemented (Figure 11), and place the adjacent part of the interim temporary back in place (Figure 12 ). This will protect the margin and axial walls of the remaining teeth, reduce sensitivity, and maintain the next segment so it is ready to be permanently cemented (Figure 13 ).
SUMMARY
Patient comfort is high on the list of concerns for dental offices. This simple and effective technique has been presented to improve both functional and esthetic comfort as patients wait for their indirect provisional restoration(s). In the authors’ practice, the response from patients to this new technique has been so positive that it has become a routine procedure.
The author has received material support from GC America.
1. Goldstein, RE. Change Your Smile. Chicago, Il: Quintessence; 1997.
2. Goldstein, RE. Esthetics in Dentistry. Philadelphia, Pa: JB Lippincott; 1976.
3. Gratton DG, Aquilino SA. Interim restorations. Dent Clin North Am. 2004;48(2):487-497.
4. Spear F. The role of temporization in interdisciplinary periodontal and orthodontic treatment. Advanced Esthetics & Interdisciplinary Dentistry. 2005;1(3):2-10.
5. Terry DA. The interim restoration. Pract Proced Aesthet Dent. 2005;17(4):263-264.
 |  |
| Figure 1 Cotton cord is placed and left for approximately 8 to 10 minutes before taking the impression. | Figure 2 Several final impressions are taken. The first is poured in fast-setting stone, which will be the model used to construct the indirect temporary. |
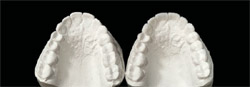 |  |
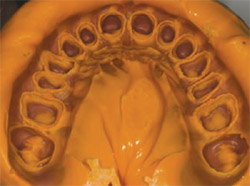
| Figure 3 A duplicate model is made of the patient’s wax-up. | Figure 4 A vacu-form matrix is made and trimmed to about 1 mm to 2 mm above the gingival margin. |
 |  |
| Figure 5 After impressions and bite registration are complete, the vacu-form matrix is tried-in. | Figure 6 Virtually any form of VPS syringe material can be used for the interim temporary. Here, to construct a tooth-appearing material, Fit Checker White is quickly syringed into the matrix. |
 |  |
| Figure 7 The matrix is placed into the mouth with gentle vibration, which helps eliminate air bubbles. The matrix is held in place carefully and much of the excess material can be wiped away with gauze, a Q-tip, tissue, or even a gloved finger. | Figure 8 The interim temporary provides the patient with an esthetic smile while covering the prepared teeth to reduce sensitivity during the time required to create an accurate (sameday) temporary. |
 | 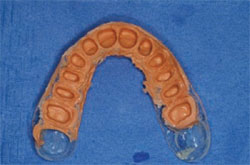 |
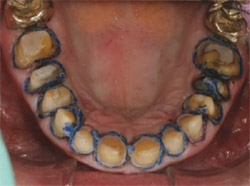
| Figure 9 The matrix is removed only after the final temporary is ready and saved in the patient’s laboratory pan. | Figure 10 In this patient the author used an orange syringe material and saved the interim temporary for the final crown seat. |
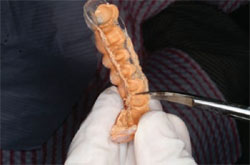 | 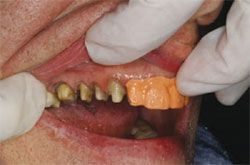 |
| Figure 11 Because four posterior crowns were cemented first, the interim temporary was trimmed to fit on the adjacent teeth to protect the margins from the tenacious RMGI crown cement. | Figure 12 Note the protection for the anterior teeth when cementing the first four posterior allceramic crowns. |
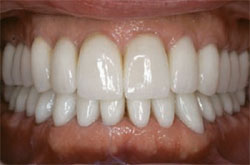 | |
| Figure 13 The patient’s 27 all-ceramic crowns cemented into place. |
| About the Authors | |
 | Ronald E. Goldstein, DDS Clinical Professor of Oral Rehabilitation Medical College of Georgia School of Dentistry Augusta, Georgia Adjunct Clinical Professor of Prosthodontics Boston University School of Dental Medicine Boston, Massachusetts Adjunct Professor of Restorative Dentistry The University of Texas Health Science Center San Antonio, Texas Private Practice Atlanta, Georgia |

