
Implant Planning Software Training in Your Office for Better Outcomes
Efficacious restorative work and surgery on implant cases starts with planning. In many cases restorative dentists and specialists can achieve more predictable results by reviewing a case using SimPlant™ (Materialise Dental, Glen Burnie, MD) or Facilitate™ (Astra Tech, Inc, Waltham, MA) software. Besides good communication, more dentists are saying the key to an optimum outcome in a mandibular case is developing a plan from the restoration down rather than from the implant up.
Learning how to use planning software and about the planning process itself can benefit all clinicians by providing a precise case blueprint for all participants to review before the patient is treated, thus minimizing uncertainty with anatomic and esthetic issues.
While options are available for traveling to a group-setting course, dentists like Jeffrey Dornbush, DDS, have opted for the convenience of one-on-one training offered by 3D Diagnostix (Brighton, MA). “Instead of driving and taking 2 days off from my practice, I was able to take the training in my office over the Internet and I scheduled it when it was convenient for me.”
Working from your own computer, you can use your own implant-training software or the instructor’s software linked to your computer over the Internet. The instructor talks you through the course over the phone in real time. Clinicians taking the course have mentioned they appreciate the opportunity to ask the instructor questions or go into more detail in areas of interest.
Dentists who would like to learn the fundamentals of using planning software would benefit from the basic course offered by 3D Diagnostix. This course covers the process of implant planning in three parts: information dental clinicians need to know about the computed tomography (CT) scanning process; going from the scan to creating an implant project; and understanding and using the planning software tools to manipulate a practice case.
The first part of the course focuses on the types of scans and important scan parameters, such as gray scale and Hounsfield values. Also, the merits of panoramic x-rays are compared to those of CT scans. In the next part of the course, the instructor discusses how CT scans are converted to 3-D files for use in implant-planning software, as well as how the planning programs make use of both 3-D and panoramic views. In the third part of the course, dentists learn how to begin a project. The instructor covers the menus and tools available in an implant-planning application and how to use those tools to navigate, view different aspects, measure, and initially place a virtual implant. They also gain an understanding of what fundamental steps need to be followed for an actual case and why.
After completing the basic course, Mike Downie, DDS, MD, said, “The course was great. I did learn a lot and I want to learn even more. I would like to learn to order surgi-guides and other more advanced techniques, grafting/sinus lift simulations, virtual teeth, etc.” For dentists who want to learn how to use the software in the context of the clinical process to completely plan an actual case, the advanced course picks up where the basic course left off. (Clinicians can choose to use their own case or one provided by the course.) In the advanced course, the basics of proper implant placement are covered, including the top-to-bottom approach where a prosthesis is used to help ensure good outcomes. This course goes on to cover selecting implants from a library of brands and models, the proper orientation of implants, creating and manipulating a virtual implant, reviewing and analyzing bone quality, customizing standard implant models from manufacturers, placing an abutment, sinus lifts, and surgical guides.
There are many functional details covered in the advanced course. For example, dentists learn how to use the tools in the planning software to select the best-sized implant for a particular situation with respect to bone quality, positioning, depth, angulation, and avoidance of certain anatomy, such as the alveolar nerve channel. The advanced course even reviews the three different types of surgical guides. General indications for each type of guide are discussed, and how to order them using the planning software is explained. At the end of the training, clinicians are not only asked if they have any questions but are given the opportunity to review any part of the training that they would like clarified.
“I really liked the idea of training on my own case instead of a general one-implant case. It wasn’t like viewing a slide presentation in a classroom; I was able to learn how to start placing implants on a complicated case and feel confident about it,” said Dr. Dornbush after completing the advanced course.
While these courses were developed to provide complete technical training on using implant planning software, it should be noted that they are not intended to take the place of the clinical training and experience necessary to perform procedures on actual patients. Nevertheless, by the end of the advanced course, dentists will have learned how to view virtual implants, abutments, and crowns in place, and manipulate the view from any perspective—all in 3D (Figure 1, Figure 2, Figure 3, Figure 4 and Figure 5). This understanding alone can serve as a powerful communication tool, enabling restorative and surgical needs to be addressed in unison for the best outcomes.
For more information contact:
3D Diagnostix
Phone: 617-820-5279
Web: www.3ddx.com
DISCLAIMER
The preceding material was provided by the manufacturer. The statements and opinions contained therein are solely those of the manufacturer and not of the editors, publisher, or the Editorial Board of Inside Dentistry. The preceding is not a warranty, endorsement, or approval for theaforementioned products or services or their effectiveness, quality, or safety on the part of Inside Dentistry or AEGIS Communications. The publisher disclaims responsibility for any injury to persons or property resulting from any ideas or products referred to in the preceding material.
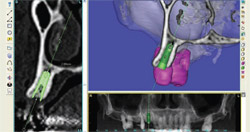 | 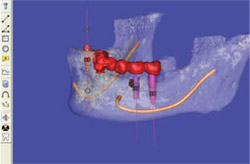 |
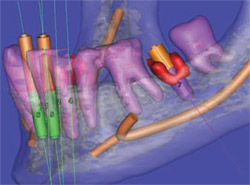
| Figure 1 "Zooming" can reveal more detail in a view for better visualization of the treatment plan. | Figure 2 Transparency tool used for enhancing the top-to-bottom approach for designing a treatment plan in the mandibular arch. |
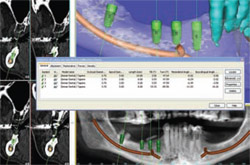 | 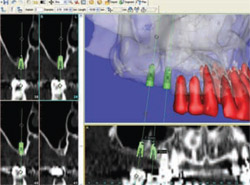 |
| Figure 3 Instantly adjust any of your implants while visualizing them on the SimPlant platform. | Figure 4 Designing a treatment plan using panoramic, cross-sectional views and virtual 3-D model. |
 | |
| Figure 5 An implant can be visualized before extraction. |

