
Enhance Esthetic Excellence through the Combination of Bleaching and a Pressed Venus Porcelain® Veneer
Andrew Shannon, DDS
Tremendous value is placed on a beautiful smile as well as proper care to maintain healthy teeth. This desire requires treatment that will produce a natural-looking smile with teeth that do not appear to be artificially created. Clinicians can design proper clinical protocol through concise communication with their patients; this understanding between clinician and patient will achieve superior comfort and function of the restorations. Clinical procedures, whether they be composite placement, crown-and-bridge, or veneer restorations, should be completed with minimal reduction to healthy tooth structure. Many patients and dentists prefer minimally invasive dentistry but each tooth should be individually evaluated based on clinical factors such as: an imbalance in the appearance of the teeth, crowding, suboptimal length, discoloration from age, receding crown margins, post-endodontic discoloration, and unsightly fillings.
CASE STUDY
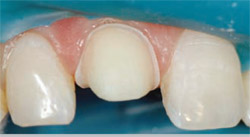
A woman in her early 20s presented with a chief complaint of discolored anterior teeth (Figure 1). The patient’s right central appeared shorter than the left central; this disparity led to the left side of her smile being more prominent (Figure 2 ). The patient also desired whiter teeth and insisted that the restorations look as natural as possible.
Given the youthful age of the patient and her overall health, the treatment plan and execution was ideal for this clinical case. Today we find that more patients are researching what esthetic dentistry could do for their smile before they enter the dental office for consultation. Patients who self-educate are more apt to enter dental offices with a concept of what they are looking to accomplish as well as a basic understanding of how dentists can meet their goals through proper treatment planning and execution. Today dental materials are stronger, more natural, and have better marginal integrity; it is not be unrealistic to believe that a restoration should last 10 to 15 years.
Treatment Plan
Treatment planning is designed to show the patient the variety of options available for any given procedure. The knowledge used to formulate a treatment plan is best gained through extensive consultation with the patient. In this case, the treatment plan was created based on the needs and financial ability of the patient and was centered on the use of bleaching the patient's teeth before the placement of a single-unit Venus® Porcelain veneer (Heraeus, Armonk, NY). Venus pressed porcelain was selected because of the need for exceptional strength, marginal integrity, and depth of color.1
After the initial consultation, the formulated treatment plan was reviewed and agreed on by both the patient and the dentist, providing for the restoration of the maxillary right central after a 2-week active treatment of bleaching.
Preparation and Temporization
During the initial visit, complete records were taken, including study model impressions, digital radiographs, and digital photographs, which were supplied to Protec Dental Laboratory (Vancouver, BC, Canada), along with measurements and instructions from the clinician, to help facilitate communication between the dental office and the laboratory. Based on careful review and the use of the materials mentioned previously and sent to the laboratory, Protec Dental Lab was able to produce the Venus Porcelain pressed porcelain veneer in this case by creating a functional and esthetic wax-up using a bite registration in accommodated centric occlusion.
A Siltech putty stint (Ivoclar Vivadent, Amherst, NY) of the wax-up was made at the laboratory. If the laboratory can scallop the stint to coincide with the gingival crest of the teeth, gingival finishing is much more concise and efficient.
Preparation of the restoration was accomplished using a set of specialized Piranha® Single-Patient-Use Diamonds (SS White Burs, Inc, Lakewood, NJ). Piranha Diamonds were used to ease concerns about cross-contamination, patient satisfaction, and office efficiency. For each patient treatment, a new diamond is used, which eliminates the need for cleaning, sterilizing, and using older diamonds.
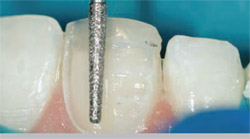
Preparation protocol requires a facial reduction of 0.5 mm. To gauge the correct amount, a three-tier depth-cutter Piranha Diamond #834-021M was used (Figure 3 ). From mesial to distal, this depth-cutter was moved across the labial surface to develop three evenly spaced grooves, each 0.5 mm in depth (Figure 4). Once the grooves were placed, the remaining facial enamel was prepared using a Piranha Diamond #850-016C (Figure 5). This diamond created the ideal chamfer margin finish line necessary for pressed porcelain veneers (Figure 6). Emphasis should be placed on the gingival margin zone to ensure proper placement of the cervical finish line at the free gingival margin or within the confines of the gingival sulcus.2 From mesial interproximal papilla to distal interproximal papilla, proper placement ensures a finish line in proportion with the free gingival margin (Figure 7). To enhance the fit between the veneer and prepared tooth structure, a Piranha Diamond #850-016F was used to refine the margin finish line. Margin refinement creates a finer impression and an easy-to-read margin for the dental laboratory technician.3-6
The three planes of reduction going from the gingival to the incisal region are crucial in creating space for the ceramist to create specialized characterizations. Also important is tucking in the interproximal embrasure points.
Next, an impression was taken of the prepared teeth using Flexitime® Heavy and Light body (Heraeus). A MemoReg® 2 bite registration was taken (Heraeus). Once complete, the dentist loaded Luxatemp® Fluorescence B1 (Zenith Dental, Englewood, NJ) into the putty stint. In less than 3 minutes the provisional was complete and ready to be polished and seated. The temporary was tacked down with Ultra-Etch® 37% phosphoric acid (Ultradent Products, Inc, South Jordan, UT) at the facial incisal region. This was noted in the chart so that no leftover resin could prevent complete seating of the case. The teeth were painted with Gluma® Comfort Bond and Desensitizer (Heraeus), and shade B1 Venus® Flow (Heraeus) was placed on the tooth and inside shell of the temporary (Luxatemp). The temporary was seated, cleaned, and secured by spot-tacking (L.E.Demetron bonding light, Kerr Corporation, Orange, CA). The temporary was cured for 30 to 60 seconds on both the labial and lingual regions. Occlusion was adjusted in centric, protrusive, and lateral excursions to prevent prematurities, and to stabilize and complete the provisionals.
Color mapping was evaluated to ensure proper emphasis was placed on all intrinsic colors and unique markings. Most importantly, all vital information was given to the ceramist, thus ensuring a natural-looking restoration.
Seating the Restorations
Final seating occurred 8 days after the preparation and temporization stage. The prepared tooth was cleaned using Consepsis® (Ultradent Products, Inc). Interproximal flossing ensured the complete removal of all temporary residues. The restoration was tried-in using water-soluble paste. After the patient approved the veneer, B05 RelyX™ veneer base (3M ESPE, St. Paul, MN) was selected for the veneer.
After the try-in, the restoration was rinsed with water, etched with hydrochloric acid for 1 minute, rinsed again, and silanated for 1 minute. Gluma Comfort Bond Desensitizer bonding agent (Heraeus) was applied and air-thinned. Next, a rubber dam was placed from second molar to second molar, which eliminated any possible contamination from entering the active field of restoration. The teeth were etched with 35% phosphoric acid for 10 to 15 seconds (Figure 8), rinsed with copious amounts of water, and then dried using an air dryer. Gluma Comfort Bond Desensitizer was placed on the tooth and light-cured for 10 to 15 seconds. RelyX Veneer B05 was applied to the tooth and to the inside of the veneer and the restoration was seated.7 Excess cement was removed. After tacking the veneer gingivally for 5 seconds, the tooth was wiped clean and cured interproximally for 5 seconds on each surface. Pinnacle bend brushes were used to clean the excess cement. The veneer was final-cured for 40 seconds on the labial, lingual, and incisal surfaces. All remaining cement was removed (Safe End #4-20 blade finishing bur, SS White Burs, Inc) and the veneer was polished (Jazz P3S Porcelain Polishers, SS White Burs, Inc). The linguo/incisal region of the restoration was finished using the Piranha Diamond #379-023VF. Interproximal clearance was provided using a serrated saw (Brasseler USA, Savannah, GA).
The clinician removed the rubber dam and visually inspected the contour, fit, and appearance of the seated veneer restoration (Figure 9 and Figure 10). A 6-month recall and an occlusal nightguard were also recommended. The long-term success of this case is predicated on good oral hygiene as well as proper follow-up maintenance.8,9 The manufacturer claims that Venus Porcelain porcelain offers lifelike esthetic properties that produce a smooth surface finish. These properties offer the patient a significant reduction in tooth-to-tooth abrasion and less plaque build-up which, combined with proper dental hygiene and maintenance, will result in a long-lasting and beautiful restoration.
CONCLUSION
Veneers are indicated to treat a wide range of common cosmetic problems that often are associated with the aging process. These factors include discoloration, enamel chipping, stress fractures, and receding crown margins. Veneers can be used cosmetically to realign teeth to make them appear straighter while at the same time improving the esthetics of the smile. When compared to lengthy orthodontic treatment, veneers are an efficient method to improve the appearance of malposed teeth. By combining the use of bleaching with a single-unit veneer, dentists are able to create a natural, balanced, and beautiful smile that is maintainable for many years. Because of an increasingly savvy population and the growing demand for better smiles, patient acceptance of these types of esthetic dental procedures will continue to grow.
References
1. Chu SJ. Use of of a synthetic low-fusing quartz glass-ceramic material for the fabrication of metal ceramic restorations. Pract Proced Aesthet Dent. 2001;13(5): 375-380.2. Garber D. Porcelain laminate veneers: ten years later. Part 1: tooth preparation. J Esthet Restor Dent. 1993;5(2):57-62.
3. Calamia JR. The etched porcelain veneer technique. NY State Dent J. 1988;54(7):48-50.
4. Rosenthal L. The art of tooth preparation and recontouring. Dent Today. 1997;16(4):48-55.
5. Gurel G. The Science and Art of Porcelain Laminate Veneers. Carol Stream, IL: Quintessence Publishing; 2003:61-82.
6. Christensen G. The changing face of aesthetic dentistry. Signature. 1997;4(2):1.
7. Bertolotti RL. Total etch—the rational dentin bonding protocol. J Esthet Dent. 1991;3(1):1-6.
8. Rosenthal L. The smile lift: a new concept in aesthetic care, Part 1. Dent Today. 1994;13(5):66-71.
9. Apa M, Rosenthal L. The rehabilitation of a smile functionally and aesthetically. Practical Aesthetics. 2005;5:18-19.
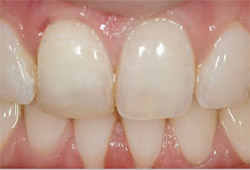 | 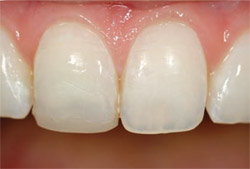 | |
| Figure 1 A woman in her early 20s presented with a chief complaint of discolored anterior teeth. | Figure 2 The patient's right central appeared shorter than the left central; this disparity led to the left side of her smile being more prominent. | |
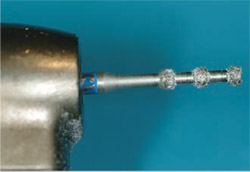 | 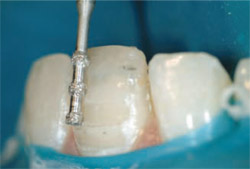 | |
| Figure 3 To gauge the correct amount of facial reduction, a three-tier depth-cutter Piranha Diamond #834-021M was used. | Figure 4 From mesial to distal, the depth-cutter was moved across the labial surface to develop three evenly spaced grooves, each 0.5 mm in depth. | |
 |  | |
| Figure 5 Once the grooves were placed, the remaining facial enamel was prepared using a Piranha Diamond #850-016C. | Figure 6 The diamond created the ideal chamfer margin finish line necessary for pressed porcelain veneers. | |
 |  | |
| Figure 7 From mesial interproximal papilla to distal interproximal papilla, proper placement ensured a finish line in proportion with the free gingival margin. | Figure 8 The teeth were etched with 35% phosphoric acid for 10 to 15 seconds, rinsed with copious amounts of water, and then dried using an air dryer. | |
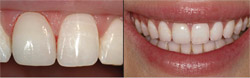 | ||
| Figure 9 and Figure 10 The clinician removed the rubber dam and visually inspected the contour, fit, and appearance of the seated veneer restoration. | ||
| About the Author | ||
 Andrew Shannon, DDS Andrew Shannon, DDSPrivate Practice Vancouver, British Columbia | ||

