
Strategies for Blending: PFM vs Porcelain Veneer
Luke S. Kahng, CDT
There is nothing like trying to match a single anterior restoration, as any technician will tell you. It is never an easy process, even within the parameters of custom shading.1 But fabricating a replacement central veneer to match an existing adjacent porcelain-fused-to-metal (PFM) crown will present an even bigger challenge.2 There are quite a few questions that arise, such as: How old is the crown? Who made it? What was his technique? What were his habits? Did he cut back on the dentin? What type of porcelain did he use? The only question technicians might be able to answer is the one regarding age, but even that is usually an estimate. This means that technicians have to mimic someone else’s methods—a technician we have never met and probably never will—because that central crown is what must be matched. There is no question that this is a tough situation and will involve some guesswork.
CASE PRESENTATION
A 40-year-old patient presented with loss of a porcelain veneer on central tooth No. 8. Her concern was her smile. Without the veneer, this tooth was not esthetically pleasing because the facial enamel was fractured interproximally. It was decided by the clinician that replacement of the porcelain veneer would be the best option because there was no pupal involvement and a veneer is the least invasive method of repair. The existing PFM crown and the original porcelain veneer had been placed at the same time but the exact date was not known. The tissue was slightly bulbous but the patient had no health concerns or known allergies. One pleasant fact about the porcelain materials used in veneers is that they are easily tolerated by most patients and almost never cause an allergic reaction.3
The clinician’s preparation was performed with a chamfer on the facial subgingival margin. He then took a full-arch impression with GC Examix™ Heavy Body Injection (GC America, Alsip, IL). The temporary veneer was fabricated from a composite material. The patient was then in-structed to schedule a custom-shade appointment with the laboratory for 3 to 4 days later, to allow time for the tissue to return to its typical state.
Most of the time, a normal 5- to 10-minute custom-shade?taking appointment is appropriate, and this particular patient’s appointment followed that timetable. But from the author’s viewpoint, the best result will come from the technician and patient spending 1 or 2 days of time together. This allows for evaluation of the patient’s habits and lifestyle because the technician can see the patient under several different circumstances during a longer timeframe. Once that visit has been completed, three different copings can be fabricated, tried in the patient’s mouth, and the patient and technician can decide together which one(s) they prefer. When a patient has followed this type of appointment, the author can almost always guarantee a perfectly matched shade for any type of re-storation, especially when the color is difficult to duplicate. Not every patient has this kind of time to spare, however, and a 5- to 10-minute appointment is often all they are able to manage.
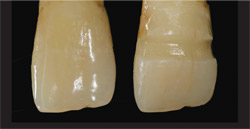
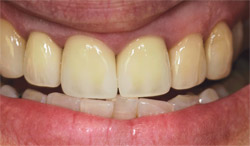
In the "before" photograph (Figure 1) with temporization, the PFM crown can be identified by its gingival one third opacity with incisal translucency and high value. It was not a clear match with any shade tab. The crown had three convex lobes, reflecting outward, with a false texture (Figure 2). The tooth’s shape was narrow, which would have to be mimicked by the technician when fabricating the new porcelain veneer. After preparation, one can see the design as well as the discoloration in the stump of tooth No. 8 (Figure 3), a consideration in the custom-shade?mapping procedure.
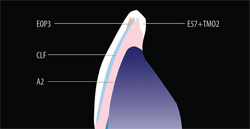
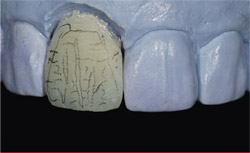
How much opacious dentin would be needed (Figure 4)? The side view demonstrates facial preparation design and dictates the amount of porcelain to apply to the restoration so that it corresponds with the adjacent crown’s side view. Once the patient was seen for a custom-shade appointment, the technician charted the custom-color, porcelain-layering technique (Figure 5). This particular chart has a very basic color blueprint because there was no need for many different applications and no concerns about surface texture because the application of glaze can always be adjusted to match with adjacent teeth.4
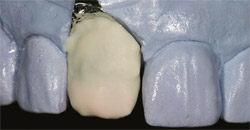
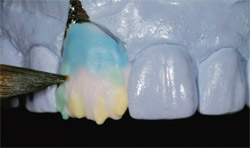
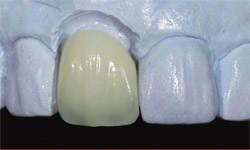
The first dentin build-up, with platinum foil, was applied using the GC InitialTM Ceramic system (GC America) (Figure 6). Application included opacious dentin on the gingival one third and dentin covering the body and incisal edge. Figure 7 is an "after" shot of the porcelain’s first firing at 890°C. After firing is complete, the next step is to examine opacity and porcelain thickness (where? how much?). If there is not enough, make a note to fill in later as needed. The second build-up with variety enamel supplement was applied using A2 dentin, clear fluorescence color, enamel opal 3, and a translucency modifier (Figure 8). The second bake stage—also known as bisque bake—with the mimicked surface texture followed. The technician’s pencil marks were to indicate contouring (Figure 9). At this stage, some clinicians prefer to try the nearly completed restoration in the patient’s mouth for fit and to check occlusion and then send the case back to the laboratory for the final polishing and glazing step. That is strictly a matter of preference, of course, and in this case the clinician preferred to wait for the finished product.
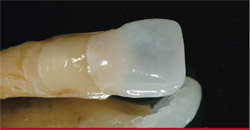
After the platinum foil was removed, the restoration was polished, glazed, and baked in the porcelain oven for the final time. It was then tried on the model, where the margins and interproximal contact were checked (Figure 10). This could be considered the most important step in the process. The technician should calibrate his or her porcelain oven carefully, as well as make good use of diamond polish and correction powder during the process for optimal results.5
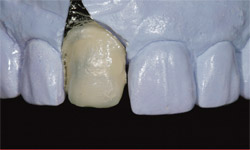
The next step can be compared to test driving a car to determine whether or not it is the right type of vehicle. In Figure 11 and Figure 12, the author is comparing the duplicate stump’s shade with the final restoration. This critical stage checks and verifies the finished color, occlusion, and fit—much the same as test driving that car to decide whether or not it is the right one. The clinician was advised to use clear cement to seat the veneer in approximately 3 weeks because of the opacious body that had been applied. Obviously, this communication between technician and clinician saves frustration and time later on.
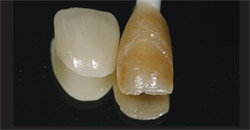
The laboratory is, of course, the perfect scientific setting to experiment. By grinding off a natural tooth’s enamel all the way to the dentin, a technician can educate himself or herself about the inherent similarities and differences between enamel and dentin (Figure 13). With genuine natural teeth donated by a clinician, the technician can give restorations a "test drive" to verify how they will appear when placed. An experienced technician knows that the study of the adjacent teeth—both natural and not—must be ongoing. Whether the tooth is convex or concave, a guide must be drawn. Likewise, the dentin’s thickness and enamel opacity must be part of the equation. What about surface texture and translucency or transparency? If a plan has been drawn and followed correctly, in the author’s experience, the restoration will be fired two to three times and no more.
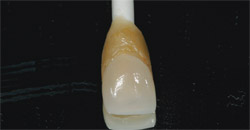
The veneer was fitted to match and tested for color agreement (Figure 14). These steps lead to the consideration of porcelain-layering techniques, which is the key to true color harmony. Note here the translucency of the tooth’s coronal portion when it was not blocked on the inside with a natural tooth. An "after" view of the cemented veneer in a rest position (Figure 15) demonstrates the color matching between the two centrals, with a side view of the same in Figure 16. Note how the emergence profile matches in texture and translucency—seamlessly linking the veneer to the PFM crown. For comparison, refer back to Figure 4 for a "before" side view.
Sometimes, as in this situation, the technician has to be a detective to solve the un-knowns in the equation. Having no knowledge about the patient’s past dental history presented a challenge because of the anonymous element it included. But by carefully uncovering what currently existed, it was possible for the technician to deliver a restorative match that pleased everyone concerned.
In this case, the patient was delighted with the final result and the natural look her teeth presented when she smiled. The clinician and technician were happy with the function and longevity that the patient could expect, as well. For best results, it always helps to work as a team—patient, clinician, and technician—together. The plan was outlined and implemented with successful results for all concerned.
ACKNOWLEDGMENT
The case presented in this article is courtesy of Rick Alwan, DDS, who owns a private practice in Naperville, IL.
References
1. Groh CL, O’Brien WJ, Boenke KM. Differences in color between fired porcelain and shade guides. Int J Prosthodont. 1992:5:510-514.2. Christensen GJ. Porcelain-fused-to-metal vs non-metal crowns. J Am Dent Assoc. 1999; 130:409-411.
3. Holistic Dental Web site. Available at: https://www.holisticdentalcare.com/Dentalphilosphy.htm. Accessed June 14, 2007.
4. Brusch M, Suckert R. A system solution that transcends ceramics—a systematic bioesthetic approach to restorations (Part 1). Dental Dialogue. 2005;5: 2-24.
5. Al-Wahadni AM. An in vitro investigation into the wear effects of glazed, unglazed and refinished dental porcelain on an opposing material. J Oral Rehabil. 1999:26(6):538-546.
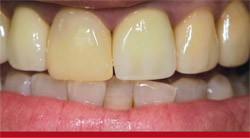 | 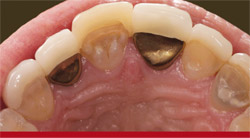 | |
| Figure 1 Preoperative view. Tooth No. 10 was a PFM, tooth No. 9 was a temporary veneer, and tooth No. 8 was a PFM. | Figure 2 Preoperative view. Note the metal lingual on teeth Nos. 8 and 10. | |
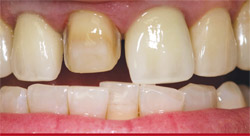 | 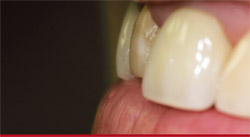 | |
| Figure 3 There was a slight discoloration in the stump shade of tooth No. 8 for the veneer. | Figure 4 Side view shows minimal preparation at gingival and middle third. | |
 |  | |
| Figure 5 Porcelain-layering techniques with basic colors to match existing PFM crowns. | Figure 6 Platinum foil on the model with opacious dentin and dentin build-up using GC Initial porcelain as seen in the shade-mapping chart. | |
 |  | |
| Figure 7 Firing the opacious dentin and dentin porcelain to check the required thickness to block out the stump shade. | Figure 8 The second build-up with a variety of enamel and dentin porcelain powders. | |
 |  | |
| Figure 9 The surface texture was matched with tooth No. 8as surface texture of the PFM crown; pencil marks indicate contouring. | Figure 10 The veneer was polished, glazed, and the platinum foil was removed. | |
 |  | |
| Figure 11 A composite die was made of the preparation to duplicate the stump shade. | Figure 12 The finished veneer was checked on the duplicate stump shade to verify the finished color. | |
 |  | |
| Figure 13 Two natural extracted teeth. On the righthand tooth, the enamel is ground down to the dentin so that we can see differences between enamel and dentin (natural teeth provided by Dr. David Schubert, Plainfield, IL). | Figure 14 The veneer was fitted on the stump shade duplicate to match and test for color agreement. | |
 | 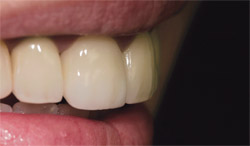 | |
| Figure 15 The veneer was cemented and an after-view color matching between the two centrals was achieved. | Figure 16 Texture and translucency seamlessly links the veneer to the PFM crown. | |
| About the Author | ||
 Luke S. Kahng, CDT Luke S. Kahng, CDTFounder and Owner LSK 121 Division of Capital Dental Technology Laboratory, Inc Naperville, Illinois | ||

