
Tough New VPS Delivers Superior Clinical Performance
To create accurate dental impressions, impression materials should perform well in six critical areas: flow and hydrophilicity to capture the precise anatomy of teeth; tensile strength, elongation percentage, toughness, and memory are needed to successfully deliver an accurate record to the dental laboratory. No one product in the vinyl polysiloxane (VPS) category has been able to deliver overall superior performance in all six of these critical areas until now. With the introduction of advanced technology from 3M ESPE (St. Paul, MN), clinicians no longer have to settle for a VPS impression material that sacrifices one property to obtain another. For the first time, 3M™ ESPE™ Imprint™ 3 VPS Impression Material provides all the features and performance properties for creating highly accurate impressions from one VPS impression material.
With excellent performance in all key areas, Imprint 3 VPS impression material offers the best balance of clinical properties for a VPS impression material. The advanced chemistry and new filler technology result in a highly flowable and hydrophilic VPS material with excellent performance in wet environments. Imprint 3 VPS also boasts superior toughness, a combination of tensile strength and elongation that resists tearing better than most leading brands for worry-free mouth removal, as well as superior memory, offering nearly 100% elastic recovery after stretching. This best-in-class elastic recovery resists distortion, delivering more accurate impressions for better-fitting final restorations that require less adjustment time.
The Imprint 3 family of impression materials (Figure 1) also features the innovative Imprint™ 3 Penta™ Putty, the first putty specially designed for the 3M™ ESPE™ Pentamix™ 2 Mixing Unit. This new thermally active putty accelerates the setting of the wash without reducing oral working time. Imprint 3 impression materials are available for easy dispensing in the Pentamix 2 mixing unit or the 3M™ ESPE™ Garant™ Cartridge Dispenser, and offer a wide range of viscosities and setting times for virtually any clinical situation.
CASE PRESENTATION
This clinical case demonstrates the replacement of an insufficient 8-year-old porcelain-fused-to-metal (PFM) bridge with an all-ceramic restoration using the new Imprint 3 VPS impression material.
The patient presented with an extended carious lesion under an 8-year-old PFM bridge (on teeth Nos. 29 through 31) mesiobuccally at tooth No. 29 because of poor marginal fit of the restoration (Figure 2). Close inspection revealed a large marginal gap of > 500 µm at the mesial aspect of tooth No. 29, allowing a carious lesion to develop and undermine the restoration over time. Tooth No. 29 experienced endodontic treatment using a lateral condensation technique with gutta percha 8 years ago. It was decided to remove the old PFM bridge, remove the caries at tooth No. 29, and restore the tooth with an all-ceramic 3M™ ESPE™ Lava™ restoration.
The old bridge was removed and the caries completely excavated. X-ray and visual control revealed that revision of the endodontic treatment was not necessary because the root canal filling was still in good condition and no apical inflammation processes could be diagnosed. Tooth No. 29 was reinforced with a fiber post to stabilize the proceeding core build-up with 3M™ ESPE™ Filtek™ Z250 Universal Restorative. Both bridge abutment teeth were prepared for the subsequent Lava restoration (Figure 3) according to the preparation guidelines. Sulcus opening before precision impression making was achieved with Ultrapak® retraction cords (Ultradent Products, Inc, South Jordan, UT) size 1 soaked with Racestyptine™ hemostatic solution for gingival retraction (Septodont, New Castle, DE). One cord was packed in two layers and removed before impression making. Potential residues of the applied hemostatic solution were removed by rinsing the prepared teeth with water.
The teeth were dried and a precision impression was made using a metal Rim-Lock® impression tray (DENTSPLY Caulk, Milford, DE) with the new Imprint 3 Penta Putty and Imprint 3 Regular Body wash material (Figure 4 and Figure 5). The Imprint 3 putty material offers a high resistance when seating the tray into the mouth. Especially in the presence of deep subgingival preparations, this high seating pressure may help push the accompanied wash material deep into the sulcus. The yellow regular-setting Imprint 3 Regular Body wash material offers a long intraoral syringing time of 1 minute, allowing syringing of multiple preparations without stress. Because of the thermally active properties of Imprint 3 Penta Putty—dispensed from the Pentamix 2 mixing unit at mouth temperature—the intraoral setting time of the accompanied wash material is accelerated and the impression can be removed from the mouth after only 3 minutes. The patient also liked the pleasant temperature of the impression material when seated in the mouth.
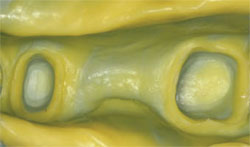
The color contrast between tray and wash material was very good, allowing an excellent readability of all relevant details. The impression entirely captured the preparation margins of the prepared teeth. Neither tears nor voids occurred at the preparation margins or at other relevant areas (Figure 6).
The impression for the bridge temporary was taken at the beginning of the treatment before the old bridge was removed. 3M™ ESPE™ Position™ Penta™ Quick Vinyl Polysiloxane Impression Material combined with the 3M™ ESPE™ Directed Flow Impression Tray is an excellent system for this indication. The temporary was made with 3M™ ESPE™ Protemp™ 3 Garant™ Temporization Material shade A3 (Figure 7). The provisional was temporarily cemented with 3M™ ESPE™ RelyX™ Temp NE Temporary Cement.
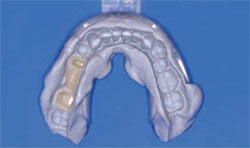
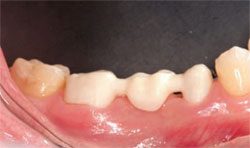
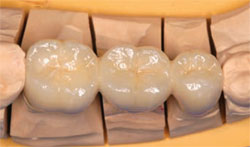
The 3M™ ESPE™ Lava™ framework shade A2 fit perfectly onto the die model and showed an excellent marginal fit when inserted into the patient’s mouth (Figure 8). This optimal result means the impression exactly reproduced the preparation margins without experiencing any kind of distortion upon removal from the mouth—a common cause of poor-fitting restorations typically discovered only after the final restorations are inserted into the mouth. In the author’s experience, the Imprint 3 impression materials used in this case withstand the forces an impression experiences upon removal (elongation, compression) better than other available impression materials. The framework was veneered with Lava Ceram shades (Figure 9).
The final restoration was permanently cemented with RelyX™ Unicem Self-Adhesive Universal Resin Cement. The final restoration displayed beautiful esthetics (Figure 10 and Figure 11) and showed an excellent marginal, approximal, and occlusal fit, requiring only a very minor occlusal adjustment at tooth No. 31.
Conclusion
This clinical case study demonstrates the balance of properties displayed by the new Imprint 3 impression materials from 3M ESPE. The new products are very reliable and deliver precise impressions—even under challenging clinical conditions—the first time you take an impression. This represents not only a benefit for the dentist who can rely on this impression material, but also leads to increased patient comfort.
Imprint 3 impression materials deliver balanced, reliable performance for virtually any clinical situation, reducing the potential for costly retakes, remakes, and adjustments. When used in combination with Imprint 3 washes, the new Imprint 3 Penta Putty creates faster setting time that translates into less waiting time for the dentist and less chair time for the patient, saving both time and money and creating a preferable dental experience for the patient.
Clinical case provided courtesy of Gunnar Reich, DMD, Munich, Germany.
For More Information
3M ESPE
Phone: 1-800-634-2249
Web: www.3MESPE.com/imprint3
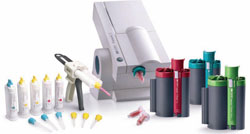 | |
| Figure 1 The family of Imprint 3 VPS Impression Materials. | |
 | 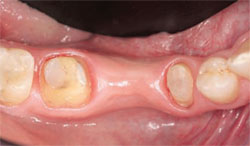 |
| Figure 2 Initial situation (buccal view). | Figure 3 Restored and prepared abutment teeth (occlusal view). |
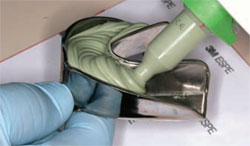 | 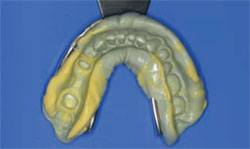 |
| Figure 4 Imprint 3 Penta Putty dispensed with Pentamix 2 Mixing Unit. | Figure 5 Imprint 3 Penta Putty and Imprint 3 Regular Body impression. |
 |  |
| Figure 6 Imprint 3 Penta Putty and Imprint 3 Regular Body impression close-up. | Figure 7 Position Penta Quick impression with Protemp 3 temporary. |
 |  |
| Figure 8 The Lava framework in the patient’s mouth (buccal view). | Figure 9 Close-up final of the Lava restoration on the die model (occlusal view). |
 | 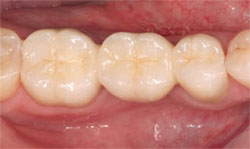 |
| Figure 10 The final Lava restoration seated into the patient’s mouth (buccal view). | Figure 11 The final Lava restoration seated into the patient’s mouth (occlusal view). |

