
Flexitime® Vinyl Polysiloxane Impression Material
In the routine practice of restorative dentistry, impression materials are one of the key materials that make our practices easier and more predictable than in the past. During the past decade, vinyl polysiloxane (VPS) impression materials have become the standard for routine fixed prosthodontic treatment. While there are many choices in VPS impression materials, certain characteristics of these products are important in deciding which one to choose.1,2 Important clinical features of impression materials include clinically relevant working time with reasonably fast setting time, handling, hydrophilic (will work in a moist environment), multiple viscosities for applications with different clinical techniques, color contrast for impression readability, accuracy and dimensional stability, excellent tear strength when removed from the sulcus, elastic recovery, absence of an unpleasant taste or odors (for better patience acceptance), and convenient delivery (automixing cartridges, putty tubes, magnum cartridges).
Although there are many excellent VPS impression materials that fulfill many of the characteristics of the ideal VPS for fixed prosthodontic applications, there is one product that helps provide for control of working and setting time through a unique chemical formulation. Flexitime® (Heraeus-Kulzer, Armonk, NY) is a VPS that has challenged the envelope between the relationship of fast setting and short working time while providing the ideal charactertistics of an impression material. In the past, if a material was fast setting, the clinician was faced with a shorter working time. For a single unit restoration, a shorter working time is not generally a problem. However, when an impression needs to be made for multiple units, the clinician would likely have to change to a slower or regular-setting VPS. With Flexitime VPS, the intraoral temperature is the defining measure of setting time. By chemically enhancing the traditional VPS formula with the addition of what the manufacturer calls Advanced ThermaSense™ (ATS), the impression material is provided a greater sensitivity to the warmer intraoral temperatures inside the patient’s mouth.
Flexitime Correct Flow (low viscosity, syringe consistency) with ATS helps to eliminate a clinician’s worry that the material will set prematurely. Flexitime with its ATS setting control works well for single-unit impressions, including crowns, inlays, and onlays, but it can be used equally well for implant and other fixed partial denture applications. Its high tear strength also makes it an ideal material to use when cast posts and cores are fabricated indirectly in the laboratory from an impression of the tooth and root canal. In the heavier viscosities, Flexitime can be used for removable prosthodontic impressions as well.
Flexitime exhibits better elastic recovery once the impression is removed from the mouth when compared to the polyether impression materials.3 Also, it has been shown that the accuracy of Flexitime is scarcely affected by storage time or by ambient humidity when compared with polyether impression materials.4 This accuracy of the impression in multiple conditions eliminates concerns about sending impressions to the laboratory for cast-and-die fabrication.
TIMING
Timing is critical for impression making. Flexitime with ATS provides a window of working time from a minimum of 30 seconds up to 2½ minutes (for loading the impression tray and seating it in the mouth). Once seated, Flexitime has a defined in-mouth holding time of 2½ minutes. Timewise, the clinician has approximately 1½ minutes to syringe the light body before seating the tray material over it. Therefore, for a quick single-unit impression a clinician could syringe the Correct Flow wash material in as little as 30 seconds, seat the impression tray loaded with Flexitime Heavy, and hold it in place for the 2½-minute in-mouth time. This yields a fast 3-minute setting time from the start of the mix.
For a more complicated case (such as a multi-unit bridge or implant) the full 2½ minutes could be used to load the impression tray and syringe the wash material into the mouth. Once seated, the tray is stabilized for the required 2½-minute in-mouth time. This provides a longer 5-minute setting time from the start of the mix. For almost all fixed prosthodontic applications, this timing flexibility provides an extended working time with a fast setting time. For those desiring an even faster setting time, Flexitime Xtreme has an in-mouth holding time of only 1 ½ minutes and a pleasant wild berry aroma for higher patient acceptability.
Choices in impression-making techniques
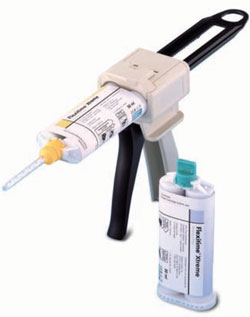
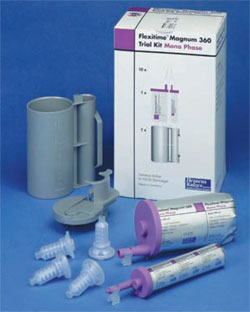
Flexitime and Flexitime Xtreme are packaged with the most popular viscosities. Depending on the clinical technique a practitioner chooses, Flexitime can be used in a putty/wash technique, a single-stage (monophase VPS or heavy/light body) technique, or a double-arch bite impression (monophase or heavy/light body) technique. Choices include a putty (Flexitime Easy Putty), regular-medium body viscosity (Flexitime Monophase), heavy-body tray viscosity (Flexitime Heavy Tray), and light-body syringeable viscosity (Flexitime Correct Flow). With Flexitime Xtreme, the choices include both heavy-body tray and wash material and Xtreme Correct Flow (Figure 1). Both products can be dispensed with either of the standard cartridges, and the Flexitime monophase is available in Magnum 360 cartridges (Figure 2).
Technique for accurate impression-making
VPS impression materials will work well with a custom tray, fitted stock tray, or a bite impression tray.2 One of the most commonly used impression techniques is a single-stage impression using the heavy viscosity in a single-arch tray or a double-arch bite tray while syringing a light-body wash to capture the details of the prepared tooth. After the try-in of the tray at the beginning of the appointment, the VPS adhesive is placed on the tray and allowed to dry fully for 5 to 10 minutes.5 Continue the procedure. When the clinician is ready to make the impression, the tissue management technique of choice can be used to expose the margins of the preparation(s).
When using the automix cartridges, assemble the cartridges and correct mixing tips in the respective applicator guns. A good hint is to make sure to always use the specific mixing tips provided or recommended by the manufacturer with each cartridge. For example, the yellow mixing tip provided for use with the Flexitime wash material will not work properly if used with the cartridge of the Flexitime tray material. Using mixing tips from other brands of material or other manufacturers is also likely to cause problems. When using the heavy body/light body technique, placing the small intraoral syringe tip on the mixing tip of the Correct Flow cartridge eliminates the clean-up of a separate syringe.
CASE 1
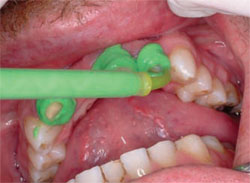
For this case, a light-body injection with a heavy-body tray technique with a fast setting VPS (Flexitime Xtreme) in a custom tray was used. After the cord was removed from around the preparations, the Correct Flow was injected around the tooth preparations starting with the tip in the sulcus and keeping the tip embedded in the impression material (working time 30 seconds to 1½ minutes) (Figure 3A).
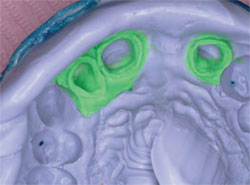
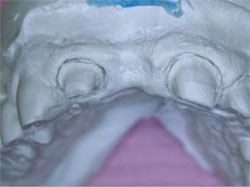
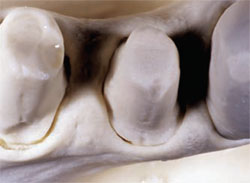
To ensure a good bond between the wash and tray material, it is a good idea to always have the tray material loaded first before starting to syringe the wash material. When the assistant has nearly completed placing the heavy tray material into the impression tray, he or she should indicate to the dentist that it is time to begin placing the wash. While syringing the material, air should not be blown to thin the light body material. This can lead to the incorporation of air bubbles and does not enhance the impression.6 Some practitioners prefer that some of the Correct Flow also be placed in the tray over the Heavy Tray material in the area being impressed. When the VPS has been dispensed as desired, the tray should be seated in the mouth and stabilized for a holding time of 1 ½ minutes. When the fast-setting VPS is set, the tray should be removed and the final impression evaluated for capturing the detail of the margins and tooth preparation (Figure 3B). The color contrast of the heavy body and wash material make reading and evaluating the impression easy. The working cast reveals the details of the margins captured in the impression (Figure 3C).
CASE 2
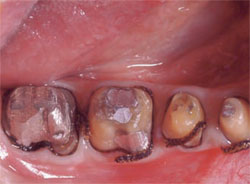
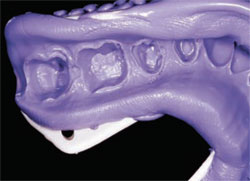
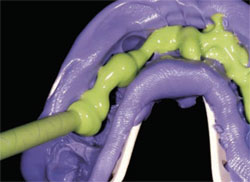
For the second case, a putty/wash hydraulic technique was used for making the impression. After the crown preparations were completed for tissue management, a double-cord technique was used with the placement of the first cord flush within the sulcus followed by a larger diameter cord that would be removed before capturing the impression (Figure 4A). Using a prefitted stock tray, a putty impression was made. The putty impression was removed after 2½minutes intraoral time (the putty was not fully set) (Figure 4B). The top cord was removed and the teeth were thoroughly cleaned and dried as the dental assistant placed the Correct Flow wash material into the putty imprint (Figure 4C). The unset Easy Putty within the tray with the Correct Flow wash material was reinserted into the mouth over the mandibular arch. Using this hydraulic technique and with the thixotropic properties of the impression material, the light body was forced to the base of the sulcus to the primary gingival retraction cord, making injection unnecessary. The impression material was allowed to set for 2½ minutes and then removed. Inspection of the impression revealed excellent detail with no tearing (Figure 4D). The primary cords were removed from the impression by cutting them with a fine-tipped surgical suture scissor. The cord should never be pulled from the impression material because this can lead to tearing of the fine details that have been captured of the margins. The cast demonstrated excellent marginal detail (Figure 4E).
Conclusion
Using Flexitime with ATS provides the practitioner with an impression material that no longer compromises between fast setting and longer working time. The ThermaSense formulation allows for an extended working time so one does not have to rush during the important phase of capturing the details of the margins and tooth preparation while providing a timely setting of the entire impression once the tray is placed in the mouth. Throughout the procedure the dentist stays in control.
This article was written by Howard E. Strassler, DMD, and Howard Weeks.
References
1. The Dental Advisor. 2003;20(10):1-4.
2. Lee EA. Impression material selection in contemporary fixed prosthodontics: technique, rationale, and indications. Compend Contin Educ Dent. 2005;26(11): 780-789.
3. Endo T, Finger WJ. Evaluation of elastic recovery on polyether impression materials. Am J Dent. 2005;18(6):355-360.
4. Kanehira M, Finger WJ, Endo T. Volatization of components from water absorption of polyether impressions. J Dent Res. 2005;84(Special Issue A):Abstract 2580.
5. Peregrina A, Land MF, Wandling C, et al. The effect of different adhesives on vinyl polysiloxane bond strength to two tray materials. J Prosthet Dent. 2005;94(3):209-213.
6. Strassler HE. Hints from Howard: is your impression technique as good as your materials. Incisal Edge. 2005;1(2):38-40.
For More Information
Heraeus Kulzer
Phone: 1-800-431-1785
Web: www.heraeus-kulzer-us.com
 |  | |
| Figure 1 Flexitime® Xtreme in cartridges. | Figure 2 Flexitime® Magnum 360 in the Monophase cartridge. | |
 |  | |
| Figure 3A Injecting the light body Correct Flow using the intraoral tip around the crown preparations. | Figure 3B Impression of the crown preparations with Flexitime® Xtreme. | |
 |  | |
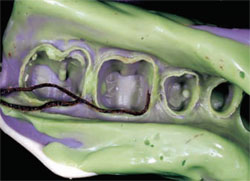
| Figure 3C The working casts demonstrate the details of the preparations and margins. | Figure 4A Crown preparations for teeth Nos. 29 through 31. (Dentistry by Dr. Robert Zena.) | |
 |  | |
| Figure 4B Flexitime® Easy Putty not fully set in the tray after removal from the mouth. | Figure 4CThe tray with putty is loaded with Correct Flow wash material. | |
 |  | |
| Figure 4D After setting, the impression is removed from the mouth demonstrating the fine detail of the preparation margins and preparation. | Figure 4E The poured cast demonstrates excellent margin reproduction. |

